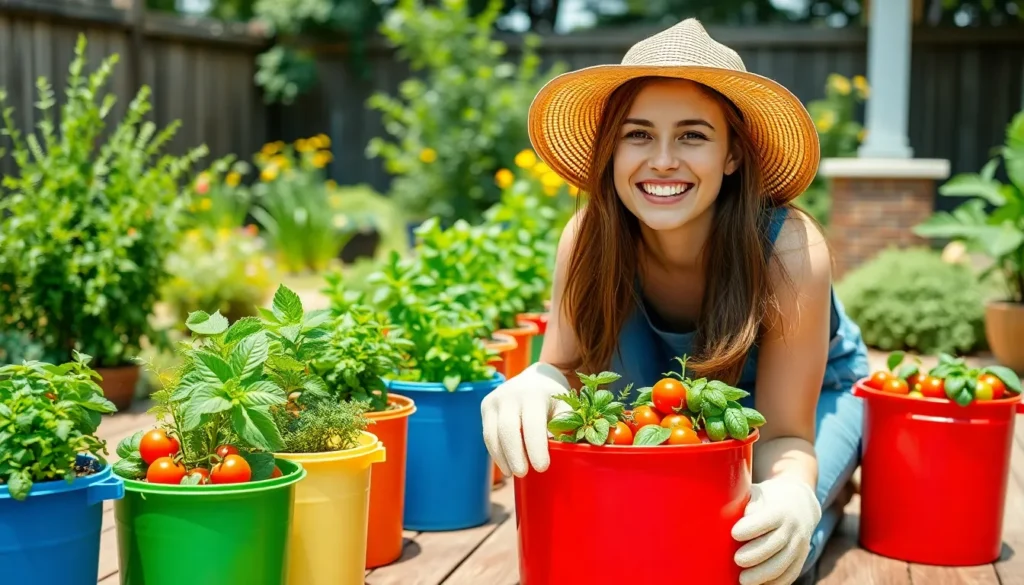
We’ve all dreamed of having a thriving garden but felt limited by space or poor soil conditions. That’s where bucket gardening transforms everything – turning ordinary containers into productive growing spaces that anyone can master.
Bucket gardens offer incredible versatility whether you’re working with a tiny balcony apartment or a sprawling backyard. We can grow everything from fresh herbs and leafy greens to tomatoes and peppers using simple five-gallon buckets. The best part? You’ll have complete control over soil quality drainage and plant placement.
Container gardening in buckets isn’t just practical – it’s surprisingly rewarding. We’ll show you how to create stunning productive gardens that move with you maximize small spaces and produce impressive harvests. From choosing the right buckets to selecting perfect plant combinations these ideas will revolutionize how you think about growing your own food and flowers.
Choose the Right Buckets for Your Garden Project
Selecting appropriate containers forms the foundation of successful bucket gardening projects. We’ll explore three main bucket types that deliver excellent results for various growing conditions and plant needs.
Food-Grade Plastic Buckets
Food-grade plastic buckets represent the gold standard for container gardening because they’re specifically designed to safely hold consumable items. These containers, typically marked with recycling codes 1, 2, 4, or 5, don’t leach harmful chemicals into your soil or plants.
Five-gallon food-grade buckets work exceptionally well for larger plants like tomatoes, peppers, and eggplants. Restaurant supply stores, bakeries, and food processing facilities often sell these buckets at reasonable prices ranging from $3 to $8 each.
BPA-free certification ensures your buckets won’t release toxic compounds that could harm your plants or contaminate your harvest. Look for clear labeling that states “food safe” or displays the appropriate recycling symbols on the bottom.
UV-resistant plastic buckets withstand sun exposure without cracking or degrading over multiple growing seasons. White or light-colored buckets reflect heat better than dark ones, preventing root damage in hot climates.
Metal Buckets and Containers
Metal buckets offer unique advantages for exact bucket gardening applications, though they require careful consideration of material composition and drainage needs. Galvanized steel buckets provide excellent durability and create attractive displays for herb gardens and decorative plantings.
Stainless steel containers resist rust and corrosion while maintaining food safety standards for edible crops. These premium options cost $15 to $30 each but last for decades with proper care.
Galvanized buckets work well for ornamental plants and non-edible flowers, creating charming farmhouse-style garden displays. But, we recommend avoiding galvanized containers for food crops due to potential zinc coating concerns.
Heat management becomes crucial with metal buckets since they conduct temperature more readily than plastic alternatives. Position metal containers in partially shaded areas or use insulating wraps during extreme weather.
Recycled Bucket Options
Recycled buckets provide cost-effective answers for budget-conscious gardeners while reducing environmental waste. We can transform various household containers into productive growing vessels with proper preparation and safety checks.
Laundry detergent buckets make excellent planters after thorough cleaning with hot soapy water and multiple rinses. Remove all labels and adhesive residue before drilling drainage holes and adding soil.
Paint buckets require special attention to ensure they contained water-based rather than oil-based products. Clean thoroughly and verify the bucket’s plastic type matches food-safe standards before using for edible plants.
Restaurant and bakery buckets often become available for free or minimal cost from local businesses. Frosting buckets, pickle containers, and sauce vessels frequently use food-grade materials perfect for garden applications.
Safety verification involves checking recycling codes, researching previous contents, and performing smell tests to detect any lingering chemical odors that could indicate unsuitable materials.
Prepare Your Buckets for Optimal Plant Growth

Once you’ve selected the right buckets for your garden project, proper preparation becomes crucial for creating healthy growing environments. These essential steps ensure your plants thrive while preventing common container gardening problems.
Drill Proper Drainage Holes
Creating adequate drainage prevents root rot and waterlogged soil conditions. We recommend drilling 6 to 8 evenly spaced holes at the bottom of each 5-gallon bucket to allow excess water to escape freely. Position these holes approximately 2 inches apart around the base perimeter for optimal water flow.
Start with a quarter-inch drill bit to create clean, precise holes. Metal buckets require different drilling techniques than plastic containers, so adjust your approach accordingly. Sharp drill bits prevent cracking and ensure smooth hole edges that won’t damage delicate root systems.
Test your drainage system before adding soil by pouring water into the prepared bucket. Water should flow out steadily without pooling at the bottom. Additional holes can be added if water drains too slowly or pools in certain areas.
Add Drainage Layer Materials
Layer broken pottery or gravel at the base of each bucket to enhance water flow. This foundation prevents soil from blocking drainage holes while creating air pockets that promote healthy root development. We suggest using materials like pea gravel, clay pot shards, or small stones for this crucial base layer.
Fill the bottom 2 to 3 inches of your bucket with drainage materials before adding soil. Larger pieces work best at the very bottom, with smaller materials layered on top to prevent soil from washing through. This system creates a reservoir that catches excess water while keeping roots above standing moisture.
Industry fabric can be placed over drainage materials to separate them from soil. This barrier prevents soil from mixing with drainage materials while allowing water to pass through freely. Coffee filters or mesh screens work as alternatives if industry fabric isn’t available.
Select Quality Potting Mix
Nutrient rich, well draining potting mix forms the foundation of successful bucket gardens. Commercial potting mixes designed for containers provide better results than garden soil, which often compacts in confined spaces and restricts root growth. Look for mixes containing perlite or vermiculite for improved drainage and aeration.
Enhance your potting mix with compost, peat moss, or coconut coir for better water retention and fertility. These organic amendments improve soil structure while providing slow release nutrients that feed plants throughout the growing season. Mix these materials thoroughly before filling your buckets.
Moisten the potting mix before planting to prevent water repellency issues. Dry potting mix often sheds water rather than absorbing it, creating uneven moisture distribution around plant roots. Add water gradually while mixing until the soil feels like a wrung out sponge.
Create Herb Gardens in Compact Bucket Spaces

Bucket gardens transform limited spaces into thriving herb sanctuaries that deliver fresh flavors and natural remedies right to our doorstep. We’ll explore strategic herb combinations that maximize our bucket garden’s potential while ensuring each plant receives optimal growing conditions.
Mediterranean Herb Combinations
Mediterranean herbs flourish in well-drained bucket environments, creating aromatic gardens that transport us to sunny coastal regions. Basil and oregano form an ideal partnership, complementing countless Mediterranean dishes while thriving in containers with excellent drainage systems. These herbs share similar water requirements and benefit from warm, sunny locations that bucket gardens provide.
Thyme and rosemary create another powerful Mediterranean duo, preferring dry conditions that make them perfect candidates for buckets with superior drainage capabilities. We can position these drought-tolerant herbs in the sunniest spots of our garden space, knowing they’ll withstand periods of minimal watering. Their woody stems and compact growth habits suit bucket constraints while delivering intense flavors for cooking.
Lavender and marjoram bring both beauty and functionality to our Mediterranean bucket collections, offering fragrant blooms alongside culinary versatility. These plants adapt well to container growing and provide natural pest deterrent properties that benefit neighboring herbs. We find their purple and white flowers create stunning visual displays that enhance any outdoor space.
Culinary Herb Pairings
Culinary herb combinations maximize our kitchen garden’s productivity by pairing complementary flavors in single bucket systems. Chives and parsley represent the perfect beginner-friendly combination, growing quickly and providing continuous harvests for salads, sauces, and garnishes. These herbs tolerate various light conditions and forgive occasional watering mistakes, making them ideal for new bucket gardeners.
Mint and lemon balm thrive together in buckets with slightly less drainage, preferring consistently moist soil conditions that suit their aggressive growing habits. We recommend containing these vigorous spreaders in dedicated buckets to prevent them from overwhelming other plants. Their refreshing flavors enhance beverages, desserts, and savory dishes throughout the growing season.
Dill and chervil create specialized culinary partnerships for pickling and delicate flavor applications, sharing similar growing requirements and harvest timings. These annual herbs produce best in cooler weather conditions, allowing us to extend our bucket garden’s productivity into fall months. We can succession plant these herbs every few weeks for continuous harvests.
Medicinal Herb Collections
Medicinal herb buckets provide natural wellness answers while creating beautiful, purposeful garden displays. Calendula and chamomile offer calming and soothing properties, producing cheerful flowers that serve both therapeutic and ornamental purposes. These gentle herbs grow well together, sharing similar water and light requirements while providing different harvest opportunities throughout the season.
Echinacea and elderberry form immune-supporting partnerships in well-drained bucket systems, delivering potent health benefits through their roots, leaves, and berries. We position these perennial herbs in permanent bucket locations where their deep root systems can establish properly. Their impressive flower displays attract beneficial pollinators while providing medicinal harvests.
Sage and peppermint create cognitive and digestive health combinations, with sage supporting mental clarity and peppermint aiding digestion and respiratory function. These herbs complement each other’s growing patterns, with sage’s woody perennial nature balancing peppermint’s vigorous spreading habits. We harvest their leaves regularly to maintain plant health and maximize their therapeutic potency.
Grow Fresh Vegetables Using Bucket Container Systems

We can transform our gardening experience by growing fresh vegetables in bucket containers that provide complete control over soil quality and positioning. These container systems offer flexibility to move plants as needed while ensuring optimal growing conditions for various vegetable types.
Root Vegetables in Deep Buckets
Carrots thrive in bucket gardens when we provide them with deep containers and loose soil mixes. We should use clean 5-gallon food-safe buckets with 6 to 8 drainage holes drilled at the bottom for optimal water management. Root vegetables like beets and radishes also flourish in these deep bucket systems because they need ample space for proper root development.
Planting density matters significantly for root vegetable success in bucket gardens. We must avoid overcrowding by providing at least half a bucket’s surface area per plant to achieve the best results. Sandy potting mix works exceptionally well for root vegetables since it allows easier root penetration and makes harvesting much simpler.
Gravel or broken pottery should line the base of our buckets to prevent soil from clogging the drainage holes. This drainage layer ensures proper water flow while maintaining the loose soil structure that root vegetables require for healthy growth.
Leafy Greens for Quick Harvests
Lettuce grows exceptionally well in bucket container systems because it’s shallow-rooted and matures quickly. We can harvest leafy greens like spinach, kale, and arugula multiple times throughout the growing season, making them incredibly productive choices for bucket gardening.
Multiple harvests become possible with leafy greens since we can cut outer leaves while allowing the center to continue growing. Even though these crops don’t use the full bucket depth, the portability and soil control make buckets ideal growing containers for leafy green vegetables.
Quick maturation rates make leafy greens perfect for beginning bucket gardeners who want to see fast results. We can expect to harvest most leafy greens within 4 to 6 weeks of planting, providing fresh vegetables for our table throughout the growing season.
Compact Tomato Varieties
Dwarf tomato varieties work best in bucket container systems because they’re specifically bred for limited space growing. We should choose bush-type tomatoes like ‘Patio,’ ‘Tumbler,’ or ‘Bush Early Girl’ that are perfectly suited for container growth rather than indeterminate varieties that grow too large.
One plant per bucket is the optimal planting density for tomatoes to ensure adequate root space and nutrient availability. We must use support cages or stakes to keep plants upright as they grow and develop fruit, preventing branches from breaking under the weight of tomatoes.
Container-grown tomatoes avoid soil-borne diseases that commonly affect ground-planted varieties, giving us healthier plants and better yields. We can move our bucket tomatoes to follow optimal sunlight patterns or protect them from unexpected frost, providing flexibility that traditional garden beds can’t offer.
| Crop Type | Bucket Suitability | Key Considerations |
|---|---|---|
| Root Vegetables | High | Deep soil, loose mix, proper spacing |
| Leafy Greens | High (shallow) | Quick harvests, easy maintenance |
| Compact Tomatoes | High | Dwarf varieties, support structures needed |
Design Colorful Flower Displays with Bucket Planters

Creating stunning visual displays with bucket planters transforms ordinary containers into vibrant focal points for your outdoor space. We’ll explore strategic combinations that deliver maximum color impact while ensuring healthy plant growth throughout the seasons.
Annual Flower Combinations
Summer blooms create spectacular displays when we combine petunias, zinnias, and marigolds in single bucket arrangements. These vibrant annuals thrive together because they share similar water and sunlight requirements while offering complementary colors like orange marigolds paired with purple petunias.
Layered planting maximizes visual appeal by positioning shorter annuals like marigolds at bucket edges with taller plants like sunflowers or zinnias in the center. This technique creates depth and prevents smaller flowers from being overshadowed by their taller companions.
Fall combinations extend seasonal interest using chrysanthemums, asters, and pansies in coordinated bucket displays. We recommend grouping three to five buckets with different annual combinations to create a flowing color story across your garden space.
Perennial Bucket Gardens
Low maintenance perennials like coneflowers, black-eyed susans, and daylilies provide years of blooms with minimal care once established in bucket containers. These hardy plants return stronger each season and require less frequent replanting than annual flower combinations.
Structural perennials such as hostas and hydrangeas add year-round interest and create backbone elements for our bucket garden designs. Hostas offer attractive foliage patterns while hydrangeas provide both seasonal blooms and interesting dried flower heads during winter months.
Cascading varieties like trailing petunias or spillover nasturtiums work beautifully when planted around bucket edges, creating natural draping effects. We position these plants to soften hard container lines and add movement to static displays.
Seasonal Color Themes
Spring awakening arrangements feature tulips, daffodils, and early-blooming hydrangeas that welcome warmer weather with fresh colors. These combinations work best when we plant bulbs in fall for spectacular spring emergence from bucket containers.
Winter interest displays incorporate evergreen boughs, holly branches, and winterberry stems to maintain visual appeal during dormant months. We add these seasonal elements to existing perennial buckets rather than replanting entirely new arrangements.
Color coordination across multiple buckets creates cohesive garden themes using analogous colors like blues and purples or complementary combinations like yellow and purple flowers. This approach ensures our bucket displays work together rather than competing for attention.
Build Vertical Bucket Gardens to Maximize Growing Space

Vertical bucket gardens transform limited spaces into productive growing areas by stacking containers upward rather than outward. We’ll explore three proven methods that maximize your growing capacity while maintaining easy access to all your plants.
Tiered Tower Systems
Stacked bucket arrangements create impressive growing towers that accommodate multiple plant varieties in minimal floor space. We position the largest bucket at the bottom and gradually decrease sizes as we move upward, ensuring stability and proper weight distribution. This system allows us to grow different crops in each tier, such as deep-rooted vegetables like carrots in bottom buckets and shallow-rooted herbs like basil in upper containers.
Drainage becomes critical in tiered systems since water flows from upper buckets to lower ones. We drill additional holes in the bottom buckets and place overflow trays beneath the entire structure to prevent water damage. Each tier receives different amounts of sunlight, so we select plants accordingly with sun-loving varieties like tomatoes at the top and shade-tolerant greens like lettuce in lower positions.
Wall-Mounted Bucket Arrangements
Wall mounting transforms unused vertical surfaces into productive growing space using sturdy brackets or hooks attached directly to walls. We secure each bucket with heavy-duty mounting hardware rated for at least twice the weight of a fully planted container, typically 15-20 pounds per bucket when filled with soil and water.
This configuration works exceptionally well for herbs, lettuce, and compact flowering plants that don’t require extensive root systems. We install buckets at varying heights to create visual interest while ensuring easy access for harvesting and maintenance. Proper spacing between mounted buckets allows adequate air circulation and prevents overcrowding that can lead to disease issues.
| Mounting Height | Plant Type | Examples |
|---|---|---|
| 2-3 feet | Leafy greens | Lettuce, spinach, arugula |
| 3-4 feet | Herbs | Basil, parsley, cilantro |
| 4-5 feet | Trailing plants | Cherry tomatoes, strawberries |
Hanging Bucket Configurations
Suspended bucket gardens use overhead space and create ever-changing growing displays that can be repositioned as needed throughout the growing season. We hang buckets from sturdy frames, pergolas, or tree branches using chains or heavy-duty rope rated for outdoor use and moisture exposure.
Weight distribution becomes crucial when designing hanging systems since each planted bucket weighs approximately 12-15 pounds. We space hanging buckets at least 18 inches apart to prevent swaying buckets from colliding and to ensure adequate light reaches all containers. This method works particularly well for trailing plants like cherry tomatoes, strawberries, and cascading flowers that benefit from gravity’s assistance in their natural growth patterns.
Maintenance access requires careful planning in hanging configurations, so we install pulleys or adjustable hanging systems that allow us to lower buckets for easier harvesting and care. Wind protection may be necessary in exposed locations to prevent excessive swaying that can stress plants and damage root systems.
Establish Efficient Watering Systems for Bucket Gardens

Watering bucket gardens efficiently becomes crucial for maintaining healthy plants while conserving water resources. We’ll explore proven methods that deliver consistent moisture to your containerized crops without waste or overwatering.
Self-Watering Bucket Modifications
Two-bucket systems create the most effective self-watering setup for container gardens. We position the bottom bucket as a water reservoir while the top bucket serves as the growing chamber. Water naturally wicks up through holes drilled in the bottom of the upper container, providing steady moisture to plant roots.
Single bucket systems offer a simpler alternative using wicking cups placed strategically within the container. These cups with holes allow soil to sit below the water line, enabling consistent moisture distribution through capillary action. We recommend this method for smaller plants or when space limitations prevent double bucket setups.
Drainage holes prevent waterlogging by allowing excess moisture to escape from the growing chamber. Drill 6 to 8 evenly spaced holes in the bottom of your top bucket to ensure proper water flow. This modification works alongside the wicking system to maintain optimal soil moisture levels.
Perlite lining acts as a natural filter between the soil and water reservoir. We apply a thin layer of perlite in the top bucket to prevent soil particles from clogging the drainage system. This volcanic glass material maintains proper water flow while keeping the reservoir clean.
Drip Irrigation Setup
PVC pipe distribution creates an even watering network throughout your bucket garden collection. We install quarter-inch PVC pipes along the rim of each bucket, connecting multiple containers to a single water source. This system ensures consistent moisture delivery across all your plants simultaneously.
Drip emitters deliver precise water amounts directly to plant root zones. Install adjustable emitters every 6 to 8 inches along your PVC pipe network to customize water flow for different plant types. Tomatoes require more water than herbs, so we adjust emitter flow rates accordingly.
Timer controls automate your watering schedule for consistent plant care. Connect a battery-powered timer to your main water line to deliver moisture at optimal times throughout the day. Early morning watering reduces evaporation while evening sessions help plants recover from daily heat stress.
Water Conservation Techniques
Sub-irrigation systems reduce water waste by allowing plants to draw moisture as needed from bottom reservoirs. We carry out this technique in our self-watering buckets, cutting water usage by up to 50% compared to traditional top watering methods. Plants access water through their root systems, eliminating surface evaporation.
Mulching applications retain soil moisture while reducing watering frequency requirements. Apply 2 to 3 inches of organic mulch like shredded bark or straw around plant bases to slow evaporation. This technique keeps soil temperatures stable and extends time between watering sessions.
Rainwater collection provides free irrigation water while reducing reliance on municipal supplies. We position rain barrels near our bucket gardens to capture roof runoff during storms. This collected water contains fewer chemicals than tap water and often provides better plant nutrition.
Moisture monitoring prevents overwatering by tracking soil conditions in real time. Insert moisture meters 2 to 3 inches deep into bucket soil to determine when plants actually need water. This data-driven approach eliminates guesswork and optimizes water usage across your entire garden collection.
Maintain Your Bucket Garden Throughout Growing Seasons

Successful bucket gardening depends on consistent maintenance practices that adapt to changing seasons and plant needs. We’ll guide you through essential care routines that keep your containers thriving year-round.
Fertilizing Schedule and Methods
Monthly fertilization keeps your bucket plants healthy when reusing soil. We recommend applying liquid fertilizer every two weeks for general container plants to maintain optimal nutrition levels. Adding compost enhances nutrient availability naturally while supporting soil structure and water retention.
Slow release fertilizers work exceptionally well for vegetables in containers. These products provide steady nutrition over extended periods, reducing the frequency of applications. We suggest alternating between liquid fertilizer and organic supplements to create a balanced feeding schedule.
Container plants require more frequent feeding than ground gardens. Nutrients wash away through drainage holes faster in buckets, making regular fertilization essential. We find that monthly feeding with quality organic fertilizer produces vigorous growth and abundant harvests.
Pest Prevention Strategies
Regular inspection catches pest problems before they become serious infestations. We check our bucket plants weekly for aphids, whiteflies, and spider mites that commonly attack container gardens. Early detection allows for immediate treatment using targeted organic methods.
Biological control offers sustainable pest management answers. We introduce beneficial insects like ladybugs and lacewings to naturally control harmful pest populations. These predators establish balanced ecosystems within our bucket gardens without chemical interventions.
Organic pesticides provide safe treatment options when pest pressure increases. Neem oil effectively controls soft bodied insects while insecticidal soap eliminates aphids and mites. We apply these treatments during cooler evening hours to prevent leaf damage and protect beneficial insects.
Seasonal Care Requirements
Spring preparation sets the foundation for successful growing seasons. We start with well draining potting mix and ensure buckets receive adequate sunlight exposure. Beginning fertilization as plants establish promotes strong root development and vigorous early growth.
Summer maintenance focuses on consistent moisture and plant support systems. We maintain steady watering schedules and provide stakes or cages for climbing plants like tomatoes and beans. Regular pruning during this active growing period promotes healthy development and prevents disease issues.
Fall transitions require reduced watering and fertilizing as temperatures cool. We prepare plants for dormancy by gradually decreasing care intensity while monitoring for frost threats. Harvesting final crops and cleaning containers prevents pest overwintering in our garden spaces.
Winter protection preserves plants through cold weather challenges. We significantly reduce watering frequency and move tender containers to sheltered locations when possible. Covering buckets with frost cloth or moving them indoors protects valuable perennial plants from freezing temperatures.
Conclusion
Bucket gardening opens up endless possibilities for creating thriving gardens regardless of your space limitations or soil conditions. We’ve shown you how to transform simple five-gallon containers into productive growing systems that can house everything from aromatic herbs to vibrant vegetables and colorful flowers.
The beauty of bucket gardening lies in its flexibility and control. You can move your plants to catch optimal sunlight design stunning vertical displays or create self-watering systems that practically maintain themselves. Whether you’re growing fresh basil on your apartment balcony or cultivating a full vegetable garden in your backyard these techniques work anywhere.
With proper preparation efficient watering systems and consistent maintenance your bucket gardens will reward you with bountiful harvests and beautiful displays throughout the growing seasons. Start small experiment with different combinations and watch as your container gardening skills flourish alongside your plants.
Frequently Asked Questions
What is bucket gardening?
Bucket gardening is a container gardening method that uses five-gallon buckets to grow plants in limited spaces or poor soil conditions. This versatile technique allows you to create productive gardens in small apartments or larger backyards, giving you complete control over soil quality and plant placement while maximizing small spaces for impressive harvests.
What types of buckets are best for gardening?
Food-grade plastic buckets are ideal for growing edible plants due to their safety and durability. Metal buckets offer aesthetic appeal but require careful heat and drainage management. Recycled buckets provide budget-friendly, environmentally conscious alternatives. Always ensure buckets are food-safe, properly cleaned, and have adequate drainage holes for optimal plant growth.
How do I prepare buckets for planting?
Drill 6-8 evenly spaced holes at the bottom for proper drainage to prevent root rot. Add a drainage layer using broken pottery or gravel to enhance water flow. Fill with quality potting mix enriched with organic amendments, and moisten the soil before planting to ensure even moisture distribution around plant roots.
What plants grow well in bucket gardens?
Bucket gardens support various plants including herbs (basil, oregano, thyme), leafy greens (lettuce, spinach, kale), root vegetables (carrots, beets, radishes), compact tomato varieties, and colorful flowers (petunias, zinnias, marigolds). Choose plants based on bucket depth, growing requirements, and your gardening goals for best results.
How do I create a vertical bucket garden?
Maximize growing space using three methods: tiered tower systems that stack buckets for different crops, wall-mounted arrangements utilizing vertical surfaces for herbs and compact plants, and hanging configurations for trailing plants. Consider weight distribution, structural support, and maintenance access when designing your vertical garden system.
What watering systems work best for bucket gardens?
Self-watering bucket modifications include two-bucket systems and single bucket setups with wicking cups. Drip irrigation using PVC pipes and emitters provides precise watering. Conservation techniques like sub-irrigation, mulching, rainwater collection, and moisture monitoring help optimize water usage while maintaining healthy plants throughout the growing season.
How do I maintain bucket gardens year-round?
Establish monthly fertilization with liquid fertilizer and organic supplements. Conduct regular pest inspections using organic control methods. Follow seasonal care: spring preparation, summer maintenance with adequate watering, fall transitions for harvest and cleanup, and winter protection for cold-weather plant survival and garden preservation.


