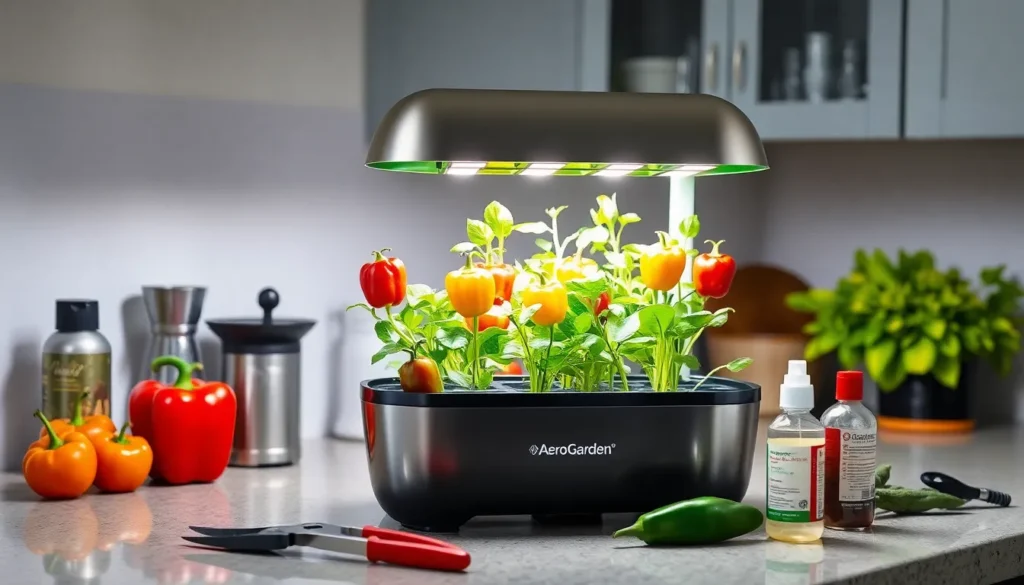
We’ve all dreamed of having fresh peppers at our fingertips year-round, and AeroGarden makes this dream surprisingly achievable. These innovative hydroponic systems transform any kitchen counter into a thriving pepper paradise, delivering restaurant-quality harvests without soil, weeds, or weather worries.
Growing peppers in an AeroGarden isn’t just convenient—it’s incredibly rewarding. We’re talking about crisp bell peppers, fiery jalapeños, and exotic varieties that’ll elevate every meal. The controlled environment means faster growth, higher yields, and peppers that taste better than anything you’ll find at the grocery store.
Whether you’re a seasoned gardener or complete beginner, AeroGarden peppers offer the perfect entry point into hydroponic growing. We’ll show you exactly how to maximize your harvests, troubleshoot common issues, and enjoy fresh peppers in as little as 60 days from seed to table.
Materials and Equipment Needed
Growing peppers in your AeroGarden requires exact equipment and supplies to ensure optimal growth and maximum harvests.
AeroGarden System Requirements
AeroGarden models with 6 or more pod capacity work best for pepper cultivation since peppers require adequate spacing between plants. The Harvest Elite 360, Farm 24XL, and Bounty Elite models provide sufficient height clearance of 24 inches or more for pepper plants to reach full maturity.
LED grow lights with full spectrum capabilities deliver the 14-16 hours of daily light that pepper plants require for flowering and fruit production. AeroGarden’s built-in lighting systems automatically cycle on appropriate schedules for optimal pepper development.
Water reservoir capacity of 1 gallon or larger supports pepper plants throughout their 90-120 day growing cycle without frequent refilling. Larger reservoirs maintain stable nutrient concentrations and pH levels that peppers need for consistent growth.
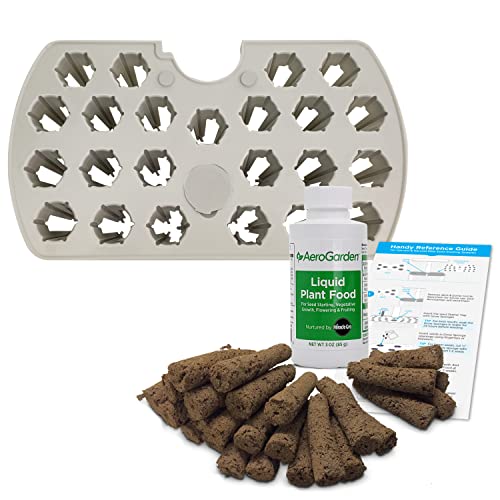
Seed Pod Kit Selection
Hot pepper seed pod kits contain varieties like jalapeño, serrano, and habanero peppers that thrive in hydroponic environments. These kits include pre-seeded pods with growing medium specifically formulated for pepper germination rates of 85-95%.
Sweet pepper options feature bell peppers, mini sweet peppers, and banana peppers that produce fruits within 60-75 days of planting. Each kit contains 3-6 seed pods depending on the pepper variety and expected plant spacing requirements.
Heirloom pepper collections offer unique varieties like purple bell peppers, chocolate habaneros, and fish peppers for gardeners seeking diverse flavors and colors in their harvests.
Additional Supplies
Liquid plant food concentrate designed for fruiting plants provides the higher phosphorus and potassium levels that pepper plants require during flowering and fruit development phases. AeroGarden’s liquid nutrients contain balanced NPK ratios of 4-3-6 for optimal pepper production.
pH testing strips or digital pH meter help maintain water pH levels between 5.5-6.5 for maximum nutrient uptake in pepper plants. Testing water pH weekly prevents nutrient lockout that reduces pepper yields by 30-40%.
Plant support stakes and ties become necessary when pepper plants reach 12-18 inches in height and begin producing heavy fruit loads. Bamboo stakes measuring 18-24 inches provide adequate support without damaging root systems.
Pruning shears or scissors allow precise removal of lower leaves and selective harvesting of mature peppers without disturbing neighboring plants or root structures.


Setting Up Your AeroGarden for Peppers

Proper AeroGarden setup ensures healthy pepper growth from seed to harvest. Following systematic assembly and configuration steps maximizes your pepper yield potential.
Assembling the AeroGarden Unit
Unpack and arrange all components according to manufacturer specifications before beginning assembly. Insert seed pods directly into growing baskets and position them evenly across the garden bed surface.
Select compact pepper varieties like dwarf bell peppers, mini sweet peppers, or compact jalapeños for optimal AeroGarden performance. These varieties adapt better to limited vertical growing space compared to full-size pepper plants.
Position growing baskets with adequate spacing between each pod to prevent overcrowding. Allow 2-3 inches between pepper plants to ensure proper air circulation and light penetration.
Moisten seeds thoroughly before placing them in growing medium if using individual seeds instead of pre-made pods. Press seeds gently into the growing sponge without burying them completely.
Installing the LED Grow Light
Adjust LED grow lights to maintain 3-5 inches distance from plant tops to prevent leaf burning while providing adequate illumination. This spacing prevents heat damage while ensuring sufficient light intensity for pepper development.
Configure light spectrum settings for vegetative growth during the first 4-6 weeks of pepper development. Most AeroGarden models automatically adjust spectrum timing based on plant selection.
Monitor light positioning weekly as pepper plants grow taller. Raise the LED panel incrementally to maintain the recommended 3-5 inch clearance throughout the growing cycle.
Verify light intensity reaches all pepper plants evenly across the growing surface. Rotate plants occasionally if certain areas receive less direct illumination.
Adding Water and Nutrients
Fill the reservoir with cool tap water to the indicated fill line without exceeding maximum capacity. Overfilling restricts oxygen flow to pepper roots and can cause root rot issues.
Add liquid nutrients according to the feeding schedule provided with your AeroGarden model. Shake nutrient bottles vigorously before each application to ensure even distribution of minerals and vitamins.
Test water pH levels weekly using pH testing strips to maintain optimal nutrient absorption. Pepper plants thrive in slightly acidic conditions between 5.5-6.5 pH range.
Replace water completely every 2-3 weeks to prevent nutrient buildup and maintain fresh growing conditions. Clean the reservoir thoroughly during each water change to remove algae or debris accumulation.
Planting Pepper Seeds in Your AeroGarden

Successful pepper cultivation begins with proper seed planting techniques that maximize germination rates. Our systematic approach ensures optimal growing conditions from the start.
Preparing the Seed Pods
Moistening the seed pods creates the ideal environment for pepper seed germination. Remove the plastic domes from each seed pod and saturate the growing medium with water until it expands fully. Press down gently on the growing medium to eliminate air pockets while maintaining loose soil structure.
Check that each pod sits securely in its designated basket position before proceeding. The growing medium should feel damp throughout without excess water pooling at the bottom.
Proper Seed Placement Techniques
Plant pepper seeds at 1/4 inch depth to achieve optimal germination rates according to hydroponic growing standards. Create a small depression in the center of each moistened pod using your finger or a small tool.
Place one seed per pod in most cases to prevent overcrowding and competition for nutrients. Some experienced growers plant 2-3 seeds per pod with plans to thin weaker seedlings later.
Cover seeds lightly with the surrounding growing medium without compacting the soil. Each seed requires adequate air circulation while maintaining consistent moisture contact.
Initial Watering and Positioning
Secure each planted pod in its designated growing basket within your AeroGarden system. Ensure all pods sit flush with the growing deck to maintain proper water circulation.
Position the LED grow lights 3-5 inches above the planted pods to provide adequate illumination without heat damage. The automated watering system maintains consistent moisture levels without manual intervention.
Add liquid plant food after seedlings emerge with their first set of true leaves rather than immediately after planting. Monitor seedling development for 7-10 days before introducing nutrients to prevent burning tender roots.
Remove growing tips when pepper plants reach maximum AeroGarden height to encourage bushy growth and increase pepper production throughout the growing season.

Optimal Growing Conditions for AeroGarden Peppers

Creating the perfect environment for your pepper plants ensures robust growth and maximum yields throughout the growing season.
Light Requirements and Timing
Position the grow light 3 to 5 inches above the top of your pepper plants to prevent stretching and promote healthy development. Most AeroGarden models automatically provide 15 to 17 hours of daily light exposure, which matches the optimal requirements for pepper cultivation.
Adjust the light height as your plants grow taller to maintain consistent coverage. Place your AeroGarden away from direct sunlight through windows to avoid overheating and temperature fluctuations that can stress your pepper plants.
Temperature and Humidity Control
Maintain temperatures between 70 to 76°F (21 to 24°C) for optimal fruit setting and plant health. Consistent temperatures within this range significantly improve both plant vigor and pepper production rates.
Keep indoor humidity levels between 40 to 60 percent to support healthy pepper growth. Avoid excessively dry or damp environments that can lead to plant stress and reduced yields.
Water Level Maintenance
Check the water reservoir regularly to ensure it remains filled to the indicated line on your AeroGarden system. Low water levels interrupt nutrient delivery and create stress conditions for your pepper plants.
Add the recommended amount of hydroponic plant food every two weeks or according to your system’s feeding schedule. Shake the nutrient bottle thoroughly before each use to ensure proper mixing of essential minerals.
Clean the pump and aerator components periodically to prevent algae buildup and mineral deposits that can affect plant health. Regular maintenance keeps your hydroponic system functioning at peak efficiency for continuous pepper production.

Nutrient Management for Healthy Pepper Growth

Proper nutrition forms the foundation of successful pepper cultivation in AeroGarden systems. Balanced nutrient delivery ensures your peppers develop strong root systems and produce abundant harvests throughout the growing season.
Understanding Nutrient Answers
AeroGarden peppers require a complete hydroponic nutrient solution containing nitrogen, potassium, and essential micronutrients for optimal growth. The ideal pH range sits between 5.5 and 6.5, while Total Dissolved Solids (TDS) levels perform best at 1400-1750 PPM for mature pepper plants.
Essential nutrients include:
- Primary macronutrients: Nitrogen for leaf development, phosphorus for root growth, potassium for fruit production
- Secondary nutrients: Calcium and magnesium for cell wall strength and enzyme activation
- Micronutrients: Iron, zinc, and manganese for chlorophyll synthesis and metabolic functions
Cal/mag supplements enhance plant health when added to standard hydroponic answers. These supplements prevent common deficiencies that appear as yellowing leaves or stunted growth in pepper plants.
Feeding Schedule and Timing
Initial feedings require 8 milliliters (2 teaspoons) of liquid plant food for the first two applications. Subsequent feedings increase to 12 milliliters (3 teaspoons) to support mature plant development and fruit production.
Feed your AeroGarden peppers using this schedule:
| Growth Stage | Nutrient Amount | Frequency |
|---|---|---|
| Seedling (0-3 weeks) | 8ml per feeding | Every 2 weeks |
| Vegetative (4-8 weeks) | 12ml per feeding | Every 2 weeks |
| Flowering/Fruiting | 12ml per feeding | Every 10-14 days |
Monitor water levels daily since pepper plants consume important amounts of water during fruit development. Add fresh water when the reservoir drops below the minimum fill line, then adjust nutrient concentration accordingly.
Monitoring pH Levels
Regular pH testing maintains optimal nutrient uptake for your pepper plants. Test pH levels every 3-5 days using digital meters or test strips designed for hydroponic systems.
Adjust pH when readings fall outside the 5.5-6.5 range:
- pH too high: Add pH down solution in small increments of 0.1ml
- pH too low: Add pH up solution gradually to avoid overcorrection
- Stable readings: Maintain current nutrient schedule without adjustments
Temperature affects pH stability, so keep your growing environment between 65-75°F (18-24°C) for consistent readings. Water temperature above 78°F can cause pH swings and reduce oxygen levels in the root zone.
Check nutrient solution clarity weekly and replace completely every 4-6 weeks to prevent salt buildup and maintain peak nutrient availability for your pepper plants.
Caring for Your Growing Pepper Plants

Once your pepper plants establish themselves in their hydroponic environment, proper care techniques become essential for maximizing their productivity and ensuring healthy development throughout the growing season.
Pruning and Training Techniques
Pruning pepper plants encourages bushy growth and increases overall yield by redirecting energy from vertical growth to lateral branching. Topping involves removing the main growing tip when plants reach 6 to 8 inches in height, which promotes the development of multiple branches and creates a fuller plant structure.
The FIM (Full-Inside-Middle) method offers another effective pruning approach that involves pinching off approximately 75% of the newest growth tip rather than removing it entirely. This technique controls plant height while encouraging more branching points than traditional topping methods.
Training pepper plants to climb or spread maximizes your AeroGarden’s limited space while improving light exposure to all parts of the plant. Regular pruning sessions every 2 to 3 weeks maintain the desired plant shape and prevent overcrowding between adjacent growing pods.
Supporting Heavy Branches
Stakes, trellises, and cages provide essential structural support for pepper plants as they begin producing fruit and their branches become weighted down. Installing support systems early in the growing process prevents damage from occurring when branches suddenly bear the weight of developing peppers.
Gently tie the heaviest fruit-bearing branches to your chosen support system using soft plant ties or strips of fabric that won’t cut into the plant stems. Position ties at multiple points along longer branches to distribute weight evenly and prevent stress fractures at connection points.
Support structures should extend at least 12 inches above the current plant height to accommodate continued growth and allow room for adjusting ties as branches develop. Check tie tension weekly to ensure they remain secure without restricting natural plant movement or growth.
Managing Plant Height
Regular pruning of top growth maintains desirable plant height and promotes even light distribution across all foliage levels within your AeroGarden system. Remove vertical shoots that grow beyond your intended plant height to keep pepper plants within the optimal 3 to 5 inch distance from LED grow lights.
Encouraging horizontal growth rather than vertical expansion allows plants to use available growing space more efficiently while preventing light burn on upper leaves. Pinch back any shoots that grow too close to the light fixture to maintain proper spacing and prevent heat damage.
Monitor plant height weekly and adjust the LED grow light position as needed to maintain the recommended distance while accommodating natural plant development. Consistent height management ensures all pepper plants receive uniform light exposure for balanced growth and fruit production.

Pollination Methods for Indoor Peppers

Indoor pepper cultivation requires manual pollination since natural pollinators like bees cannot access your AeroGarden system. Hand Pollination Techniques increase fruit production by up to 80% compared to relying on air circulation alone.
Hand Pollination Techniques
Gentle shaking produces the most effective results for pepper pollination in AeroGarden systems. Grasp the main stem and shake the entire plant for 10 to 15 seconds to mimic natural wind patterns. This motion allows pollen to fall from the stamens directly onto the stigma within each flower.
Vibration methods using an electric toothbrush create consistent pollen distribution across multiple flowers. Hold the toothbrush against the flower stem for 3 to 5 seconds per bloom to loosen pollen effectively. Repeat this process on each open flower during peak pollination hours between noon and 3 PM.
Cotton swab technique offers precise control over pollen transfer between individual flowers. Gently insert a dry cotton swab into the center of an open flower and rotate it to collect pollen. Transfer the collected pollen to the stigma of the same flower or cross pollinate with another bloom on the same plant.
Using a Small Brush Method
Small paintbrush application provides superior pollen collection compared to cotton swabs due to the brush bristles’ texture. Select a clean, dry brush with soft bristles approximately 1/4 inch in diameter for optimal results. Insert the brush into the flower center and twist gently to gather pollen on the bristles.
Pollen transfer process requires moving the loaded brush to the stigma of the target flower within 30 minutes of collection. Gently dab the brush against the stigma to deposit pollen grains effectively. Clean the brush between different pepper varieties to prevent unwanted cross pollination.
Daily pollination schedule maximizes fruit set when performed consistently during morning hours. Pollinate each open flower once per day for 3 consecutive days to ensure successful fertilization. Mark pollinated flowers with small plant tags to track which blooms have received attention.
Encouraging Natural Pollination
Air circulation enhancement supports natural pollen movement within your AeroGarden environment. Position a small fan 2 to 3 feet away from your pepper plants to create gentle air movement without causing plant stress. Run the fan for 2 to 4 hours daily during peak flowering periods.
Temperature optimization influences pollen viability and stigma receptivity in pepper flowers. Maintain ambient temperatures between 70 to 76°F during pollination hours to maximize fertilization success rates. Most pepper varieties achieve optimal pollination when temperatures remain consistent throughout the flowering period.
Humidity control affects pollen release and flower development in indoor growing systems. Keep humidity levels between 40 to 60 percent to prevent pollen from becoming too sticky or too dry for effective transfer. Monitor humidity with a digital hygrometer placed near your AeroGarden unit.
Harvesting Your AeroGarden Peppers

Harvesting peppers at the right time ensures optimal flavor and encourages continued production from your AeroGarden plants. Timing your harvest correctly maximizes both the quality and quantity of peppers throughout the growing season.
Identifying Ripe Peppers
Color transformation signals pepper ripeness as varieties like Anaheim peppers change from green to their final hue of red, yellow, or orange. Sweet pepper varieties follow this same pattern of color development as they mature. Firm texture with slight give when pressed indicates peak ripeness for harvest.
Visual cues provide the most reliable indicators of pepper maturity. We examine each pepper for its variety-exact final color rather than harvesting at the immature green stage. Touch testing reveals proper firmness—ripe peppers yield slightly to gentle pressure while maintaining their structural integrity.
Proper Harvesting Techniques
Gentle twisting motion removes peppers without damaging the plant or stem structure. Grasp the pepper near its base and rotate clockwise or counterclockwise until it separates cleanly from the branch. This technique preserves the plant’s energy for continued fruit production.
Timing your harvests based on need rather than abundance prevents plant stress from overproduction. We harvest peppers individually as they ripen instead of collecting multiple fruits simultaneously. Clean hands or sanitized garden shears provide alternative harvesting methods for peppers with stubborn stems.
Maximizing Yield Through Continuous Harvesting
Regular pruning every two weeks encourages bushy growth patterns and increases fruiting sites throughout the plant structure. Remove growing tips and excess foliage to redirect energy toward pepper development rather than leaf production.
Pod rotation maintains healthy root systems by preventing tangled growth patterns in the nutrient solution. Turn each growing basket 90 degrees weekly to ensure even root distribution and optimal nutrient uptake. Remove overcrowded plants when spacing becomes insufficient for proper airflow and light penetration.
Pollination assistance improves fruit set rates even in self-pollinating pepper varieties. Gently vibrate plants or use a small brush to transfer pollen between flowers during peak blooming periods. This manual intervention increases successful fertilization and subsequent pepper development.
| Maintenance Task | Frequency | Purpose |
|---|---|---|
| Plant pruning | Every 2 weeks | Encourage bushy growth |
| Pod rotation | Weekly | Prevent root tangling |
| Pollination assistance | Daily during bloom | Increase fruit set |
| Overcrowding removal | As needed | Improve nutrient distribution |
Common Issues and Troubleshooting

Growing peppers in your AeroGarden presents unique challenges that require exact answers. Understanding these common problems helps us maintain healthy plants and maximize pepper production throughout the growing season.
Yellowing Leaves Answers
Inconsistent watering patterns cause the most yellowing issues in AeroGarden pepper plants. Check your water reservoir levels daily and maintain consistent moisture levels to prevent plant stress. Nutrient balance plays a critical role in leaf health, so verify that your nutrient solution maintains proper pH buffering to prevent deficiencies.
Regular pruning improves air circulation around pepper plants and reduces stress-related yellowing. Remove lower leaves that show signs of deterioration and thin overcrowded areas. Monitor your plants for droopy or leaning stems, which often indicate that pepper seeds were planted too high in the growing sponge, exposing the stem base to air.
Poor Fruit Production Problems
Nutrient deficiency directly impacts pepper fruit development and overall yield. Ensure adequate calcium availability in your nutrient solution to prevent blossom end rot, a condition where peppers develop dark, sunken spots due to insufficient calcium uptake. Calcium deficiency accounts for approximately 60% of poor fruit production cases in hydroponic pepper systems.
Incorrect grow light positioning affects plant health and fruit set significantly. Position LED lights 3 to 5 inches above your pepper plants and maintain 15 to 17 hours of daily exposure. Poor air circulation from overcrowded plants reduces fruit production by limiting proper pollination and creating sickly growing conditions.
Pest Management in Indoor Gardens
Regular inspection prevents major pest infestations in your AeroGarden pepper plants. Check leaves weekly for spider mites, aphids, and whiteflies, which commonly attack indoor pepper plants. Look for tiny webs, sticky honeydew residue, or small flying insects around your growing area.
Organic treatment methods provide effective pest control without compromising your pepper harvest. Apply neem oil spray every 7 days during active infestations, focusing on leaf undersides where pests typically congregate. Use insecticidal soap answers for aphid control, applying directly to affected plant areas during evening hours when grow lights are off.
Nutrient Deficiency Signs
Yellowing leaves typically indicate nitrogen deficiency in AeroGarden pepper plants. This deficiency appears first on older, lower leaves and progresses upward if left untreated. Add nitrogen-rich liquid plant food according to your feeding schedule to address this issue.
Stunted growth patterns signal insufficient phosphorus or potassium levels in your nutrient solution. Phosphorus deficiency causes purple leaf discoloration and delayed flowering, while potassium deficiency creates brown leaf edges and weak stems. Brown spots scattered across pepper leaves indicate magnesium deficiency, which responds well to Epsom salt additions at 1 teaspoon per gallon of water.
| Deficiency Type | Primary Symptoms | Treatment Method |
|---|---|---|
| Nitrogen | Yellowing lower leaves | Increase liquid plant food frequency |
| Phosphorus | Purple leaf discoloration | Add phosphorus-rich fertilizer |
| Potassium | Brown leaf edges | Apply potassium supplement |
| Calcium | Blossom end rot | Maintain pH 6.0-6.5 range |
| Magnesium | Brown leaf spots | Add 1 tsp Epsom salt per gallon |

Tips for Maximum Pepper Production

Building on proper care and maintenance practices maximizes pepper yields in your AeroGarden system. Strategic variety selection and timing techniques create continuous harvests throughout the year.
Variety Selection for Best Results
Compact pepper varieties deliver superior performance in AeroGarden hydroponic systems compared to full-sized cultivars. Bell peppers like ‘Mini Belle’ and ‘Lunch Box’ produce abundant harvests while maintaining manageable plant heights between 12 to 18 inches. Hot pepper varieties including jalapeños, serranos, and Thai chilies adapt exceptionally well to container growing conditions.
Cherry pepper varieties such as ‘Sweet Cherry’ and ‘Hot Cherry’ generate multiple fruits per plant while requiring minimal space. Banana peppers and Hungarian wax peppers offer excellent yields in confined growing environments. Ornamental pepper varieties like ‘Black Pearl’ and ‘Medusa’ combine productive harvests with attractive foliage displays.
Extending Growing Seasons
Year-round pepper cultivation becomes possible through indoor hydroponic systems like AeroGarden regardless of outdoor weather conditions. Indoor growing eliminates seasonal limitations and frost concerns that typically end outdoor pepper production in fall months.
Starting pepper plants indoors during late winter months extends the traditional growing season by 6 to 8 weeks before outdoor transplanting. This early start technique allows gardeners to harvest mature peppers by midsummer rather than waiting until late August or September.
Climate-controlled indoor environments maintain consistent temperatures between 70 to 76°F throughout winter months when outdoor temperatures drop below pepper growing requirements. Continuous light exposure from LED grow systems supports active growth during shorter daylight periods of winter seasons.
Succession Planting Strategies
Continuous pepper harvests result from planting new seeds every 3 to 4 weeks throughout the growing season. This staggered planting approach ensures mature peppers become available for harvest while younger plants continue developing.
Multiple pepper varieties planted at different stages create diverse harvests over extended time periods. Early-maturing varieties like cherry peppers provide quick harvests within 60 days while longer-season bell peppers develop over 80 to 90 days.
Rotating pod positions every 2 weeks prevents individual plants from monopolizing prime growing locations within the AeroGarden system. This rotation technique ensures equal light distribution among all pepper plants and promotes uniform development across different growth stages.
Maintenance and Cleaning Your AeroGarden

Proper maintenance and cleaning extend the lifespan of your AeroGarden system while ensuring healthy pepper production. Regular upkeep prevents bacterial growth and maintains optimal growing conditions for continuous harvests.
Regular Cleaning Schedule
Daily cleaning tasks include checking water levels and removing any debris floating in the reservoir. Remove dead or yellowing leaves immediately to prevent disease spread and maintain system hygiene.
Weekly maintenance involves wiping down the grow light hood with a damp cloth to remove dust buildup. Clean the water reservoir indicator and pump components to prevent algae formation and ensure proper circulation.
Monthly deep cleaning requires emptying the entire water reservoir and scrubbing all surfaces with a mild bleach solution. Rinse all components thoroughly with cool tap water before refilling to eliminate any chemical residue.
Quarterly maintenance includes disassembling the pump system and cleaning individual components with a soft brush. Replace any worn gaskets or seals to maintain proper water circulation and prevent leaks.
Replacing Grow Lights
Standard LED grow lights require replacement every 6 to 12 months to maintain optimal light intensity for pepper growth. Monitor light output regularly as diminished brightness reduces flowering and fruit production significantly.
Installation process begins with unplugging the AeroGarden system and allowing lights to cool completely before handling. Remove the old light panel by lifting the release tabs and disconnecting the power connector.
Positioning new lights requires maintaining the 3 to 5 inch distance from plant tops to prevent leaf burning. Adjust the light height weekly as pepper plants grow taller to ensure consistent light exposure across all growing pods.
Light replacement indicators include reduced pepper production, slower growth rates, and stretched or leggy plant appearance. Replace lights immediately when these symptoms appear to restore optimal growing conditions.
Preparing for New Plantings
System sanitization starts with removing all plant material and disposing of used growing medium properly. Soak all reusable components in a 10% bleach solution for 15 minutes to eliminate pathogens and bacteria.
Seed pod preparation involves inserting new growing sponges into clean growing baskets before planting. Pre-soak pepper seeds for 12 to 24 hours in warm water to improve germination rates and reduce sprouting time.
Fresh nutrient solution requires filling the reservoir with cool tap water and adding the appropriate amount of liquid plant food. Begin applying nutrients once seedlings develop their first set of true leaves rather than immediately after planting.
Growing medium replacement includes disposing of old sponges and installing fresh ones in each growing basket. Clean all growing basket surfaces thoroughly to remove salt buildup and residual nutrients from previous plantings.
Conclusion
Growing peppers in your AeroGarden transforms your kitchen into a year-round pepper paradise. We’ve covered everything from selecting the right equipment to mastering pollination techniques that’ll keep your harvests abundant.
The key to success lies in maintaining consistent care routines and understanding your plants’ needs. With proper lighting schedules nutrient management and regular maintenance your pepper plants will reward you with fresh flavorful harvests for months.
Remember that patience and attention to detail make all the difference. Start with compact varieties follow our proven techniques and you’ll soon enjoy the satisfaction of cooking with peppers you’ve grown yourself.
Your AeroGarden pepper journey starts now – and with these strategies you’re well-equipped for continuous success.
Frequently Asked Questions
What is the best AeroGarden model for growing peppers?
The AeroGarden Harvest Elite 360, Farm 24XL, and Bounty Elite are top choices for pepper cultivation. These models offer six or more pod capacity, adequate water reservoir size (at least one gallon), and proper LED grow light systems. Choose models with sufficient height clearance to accommodate pepper plants as they mature.
How long does it take to grow peppers in an AeroGarden?
You can enjoy fresh peppers in as little as 60 days from planting. Germination typically occurs within 7-14 days, followed by steady growth. The exact timeline depends on the pepper variety, with compact varieties like ‘Mini Belle’ often producing faster than larger pepper types.
What pepper varieties work best in AeroGarden systems?
Compact pepper varieties perform exceptionally well in AeroGarden systems. Recommended options include ‘Mini Belle,’ ‘Lunch Box,’ cherry peppers, and small jalapeño varieties. These compact plants maximize space efficiency while producing abundant harvests compared to larger pepper varieties that may outgrow the system.
How often should I add nutrients to my AeroGarden pepper plants?
Add hydroponic plant food every two weeks once seedlings develop their first set of true leaves. Follow the manufacturer’s feeding schedule and monitor nutrient solution clarity. Replace the entire nutrient solution monthly to prevent salt buildup and maintain optimal growing conditions for healthy pepper development.
Do AeroGarden peppers need manual pollination?
Yes, AeroGarden peppers require manual pollination since natural pollinators cannot access indoor systems. Use gentle shaking, an electric toothbrush, cotton swabs, or small brushes to transfer pollen between flowers. Perform pollination daily during flowering season for maximum fruit production and higher yields.
How should I maintain optimal growing conditions for peppers?
Position LED grow lights 3-5 inches above plants, providing 15-17 hours of daily exposure. Maintain temperatures between 70-76°F (21-24°C) and humidity levels of 40-60%. Check water levels daily, clean the system monthly, and ensure proper air circulation around plants for healthy growth.
When should I harvest my AeroGarden peppers?
Harvest peppers when they reach full color transformation and desired size. Most peppers can be picked when green or allowed to ripen to red, yellow, or orange. Use clean scissors or pruning shears to cut stems, avoiding damage to the plant. Regular harvesting encourages continued production.
How can I maximize pepper production in my AeroGarden?
Implement succession planting every 3-4 weeks for continuous harvests. Rotate pod positions bi-weekly for even light distribution. Prune regularly to encourage bushy growth and support heavy branches with stakes. Select compact varieties and maintain consistent care schedules for optimal yields throughout the growing season.