Transform your garden into a vertical paradise with creative trellis answers that maximize space and elevate your growing game. Whether you’re working with a tiny balcony or sprawling backyard we’ve discovered that smart trellis designs can double your growing capacity while adding stunning architectural interest to any outdoor space.
From rustic DIY wooden structures to sleek modern metal frameworks the right trellis doesn’t just support your climbing plants—it becomes a living piece of garden art. We’ve tested dozens of trellis styles and found that the most successful gardens combine function with beauty creating vertical growing systems that produce abundant harvests while looking absolutely gorgeous.
Ready to discover which trellis ideas will work best for your space and growing goals? We’re sharing our favorite proven designs that’ll have your neighbors asking for your gardening secrets while your plants reach new heights of productivity.
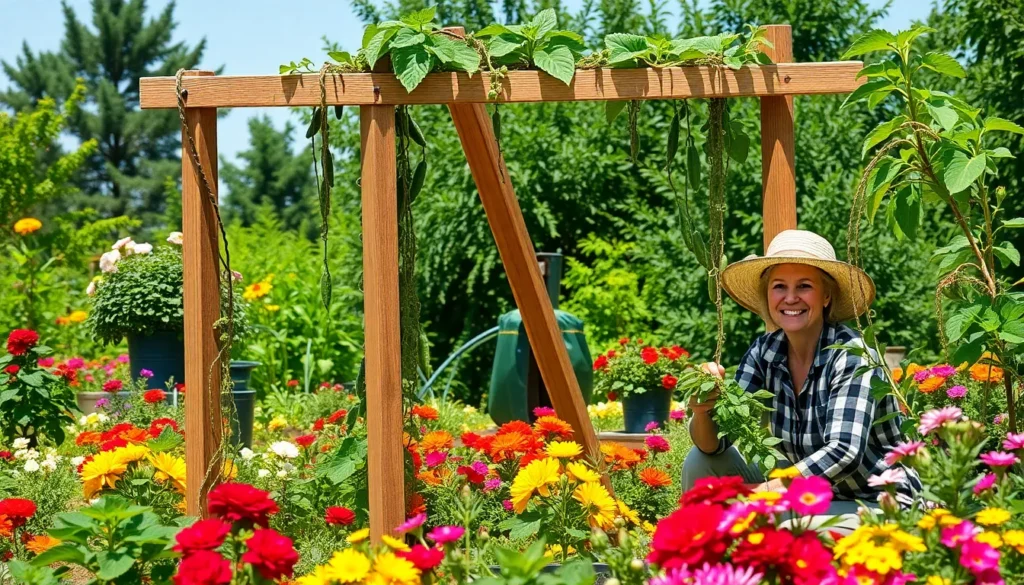
DIY Wooden A-Frame Trellis for Climbing Vegetables
Building your own wooden A-frame trellis creates the perfect vertical growing solution for heavy climbing vegetables while adding rustic charm to your garden space.
Materials and Tools Needed
Essential lumber supplies include:
- Cedar or pressure-treated 2×4 boards (8 pieces at 8 feet long)
- Wood screws (3-inch galvanized screws work best)
- Chicken wire or welded wire mesh (6 feet wide by 8 feet long)
- Galvanized staples for wire attachment
- Wood stain or sealant for weather protection
Required tools for construction:
- Circular saw or miter saw for precise cuts
- Power drill with screwdriver bits
- Level to ensure proper alignment
- Measuring tape and pencil for marking
- Wire cutters for mesh trimming
- Staple gun for secure wire attachment
We recommend using cedar lumber because it naturally resists rot and insects without chemical treatment. Pressure-treated pine offers a budget-friendly alternative that lasts 10-15 years with proper maintenance.
Step-by-Step Construction Guide
Frame assembly starts with cutting your boards:
- Cut four 2×4 boards to 7 feet for the main frame legs
- Cut four crosspieces to 3 feet for horizontal support
- Sand all cut edges to prevent splinters during assembly
Building the A-frame structure requires precise measurements:
- Create two identical triangular frames by connecting leg boards at a 60-degree angle
- Attach horizontal crosspieces 2 feet and 4 feet from the ground on each frame
- Connect both triangular frames with a ridge board across the top
- Secure all joints with 3-inch galvanized screws for maximum stability
Wire mesh installation completes your trellis:
- Stretch chicken wire or welded mesh between the two frame sides
- Staple the wire every 6 inches along all frame members
- Pull the mesh tight to prevent sagging under plant weight
- Trim excess wire with cutters for a clean finish
We’ve found that pre-drilling screw holes prevents wood splitting and ensures stronger joints that withstand wind and plant loads.
Best Plants for A-Frame Support
Heavy climbing vegetables thrive on sturdy A-frame structures:
- Pole beans produce continuously when given vertical space to climb
- Peas (snap peas and snow peas) use their tendrils to grip wire mesh naturally
- Cucumbers benefit from air circulation that prevents fungal diseases
- Small winter squash varieties like delicata or acorn squash work well
Medium weight climbers adapt perfectly to A-frame growing:
- Cherry tomatoes stay manageable when trained up the structure
- Armenian cucumbers grow vigorously without overwhelming the frame
- Climbing nasturtiums add colorful flowers while producing edible leaves
Training techniques maximize your harvest potential:
- Guide young plants through the bottom wire openings
- Weave stems through mesh as they grow taller
- Prune side shoots on tomatoes to focus energy on main stems
- Harvest regularly to encourage continued production
We’ve discovered that planting on both sides of your A-frame doubles your growing capacity while creating an attractive garden focal point that neighbors will admire.
Repurposed Ladder Trellis for Vintage Garden Appeal

Transform discarded ladders into charming vertical supports that bring nostalgic character to your garden space. We’ll show you how to select, prepare, and position these unique trellises for maximum visual impact.
Choosing the Right Ladder Style
Vintage wooden ladders offer the most authentic rustic charm for traditional garden settings. Paint them in soft pastels or apply natural wood stains to complement your existing garden decor palette.
Metal ladders create striking modern focal points that work beautifully in contemporary landscapes. Powder coating provides excellent weather resistance while allowing you to match your garden’s color scheme perfectly.
Foldable ladders give you incredible flexibility for seasonal garden changes and winter storage needs. Position them easily throughout the growing season and fold them away when dormant plants no longer need support.
Weatherproofing and Preparation Tips
Apply waterproof sealant to wooden ladders before installation to prevent moisture damage and extend their lifespan significantly. Marine grade polyurethane provides the best protection against harsh weather conditions.
Strengthen loose joints using galvanized screws or metal brackets to ensure your trellis remains stable under plant weight. Check all connection points and replace any wobbly rungs before adding climbing vegetation.
Clean thoroughly with mild detergent and disinfectant to remove dirt, old paint chips, and potential plant pathogens. Sand rough surfaces smooth to prevent damage to delicate plant stems and tendrils.
Creative Placement Ideas
Corner placement maximizes limited garden space while creating intimate growing nooks for climbing roses or clematis vines. Position the ladder at a slight angle against existing fences or walls for added stability.
Arbor entrance installations transform ordinary garden pathways into welcoming outdoor rooms filled with fragrant climbing plants. Frame your garden gate or pathway entrance with ladder trellises covered in jasmine or honeysuckle.
Vertical divider arrangements separate different garden zones while maintaining visual flow throughout your industry design. Use ladder trellises to distinguish between vegetable plots and ornamental flower beds without blocking sunlight completely.


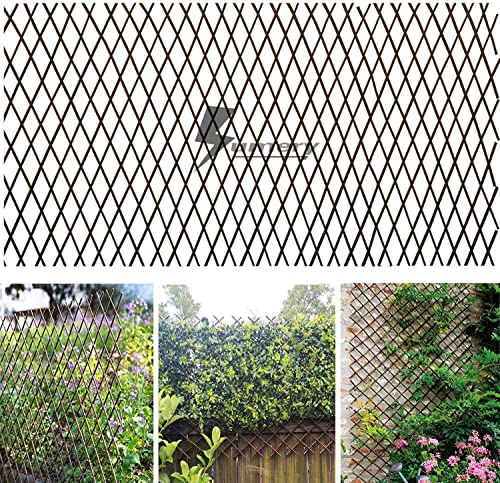
Wire Mesh Panel Trellis for Maximum Growing Space

Wire mesh panels offer gardeners an incredibly versatile and cost-effective solution for supporting climbing plants while maximizing every square inch of growing space. This approach provides excellent air circulation and sunlight penetration, creating optimal conditions for healthy plant development.
Types of Wire Mesh to Consider
Galvannealed steel mesh stands out as our top recommendation for outdoor garden applications because it offers superior durability and resistance to corrosion. This treated steel option withstands harsh weather conditions and maintains its structural integrity season after season.
Standard steel mesh provides an economical choice for most garden installations where budget considerations are important. While it may require more frequent replacement than galvannealed options, it delivers reliable performance for typical climbing plants like beans and peas.
Copper or aluminum mesh adds decorative appeal to your garden space while offering excellent longevity depending on your local climate conditions. These premium materials develop attractive patinas over time and resist rust formation better than untreated steel alternatives.
Installation and Mounting Options
Wall mounting creates a space-saving vertical growing surface by securing mesh panels directly to existing structures. We recommend using a hammer drill with plastic masonry anchors and screw eye hooks for masonry walls, ensuring secure attachment points that can handle plant weight throughout the growing season.
Freestanding installations offer flexibility in garden placement and allow for double-sided planting opportunities. Wooden or metal stakes provide the necessary support structure, but we emphasize selecting stakes sturdy enough to handle both mesh weight and fully loaded plants during peak growing periods.
Ideal Crops for Wire Support
Climbing vegetables like peas, beans, and cucumbers thrive on wire mesh systems because the grid pattern provides many attachment points for tendrils and vine growth. These crops benefit from the vertical growing space while making harvesting easier at eye level.
Flowers and vines including clematis, roses, and morning glories create stunning vertical displays when trained on wire mesh trellises. The open mesh structure allows these ornamental plants to weave naturally while maintaining proper air circulation around blooms.
Fruit vines such as grapes and kiwis require sturdy wire mesh installations capable of supporting heavier fruit loads. We recommend reinforcing these systems with additional stakes or wall anchors to accommodate the substantial weight these productive vines generate.


Bamboo Teepee Trellis for Natural Garden Aesthetics

We’ve discovered bamboo teepee trellises offer the perfect blend of functionality and rustic charm for natural garden aesthetics. These self-standing structures provide excellent support for vining plants like peas, beans, and decorative climbers while creating beautiful focal points with lush foliage and colorful blooms.
Selecting Quality Bamboo Poles
Quality bamboo poles form the foundation of a sturdy teepee trellis that’ll support your climbing plants throughout the growing season. We recommend choosing poles that measure 6 to 8 feet long to ensure proper height and stability for most garden applications. Gathering 6 to 8 poles creates the ideal framework for a standard teepee structure that won’t collapse under plant weight.
Long, thin bamboo poles work best, though we’ve found wooden branches can serve as suitable alternatives when bamboo isn’t available. Inspect each pole for cracks, splits, or weak spots before assembly to prevent structural failures later. Select poles with similar diameters to maintain balance and create a uniform appearance in your garden design.
Assembly Techniques and Binding Methods
Arranging poles evenly on the ground provides the starting point for creating your bamboo teepee trellis. We begin by laying out all poles in a circular pattern, ensuring equal spacing between each piece for optimal plant coverage. Binding the poles together about an inch from the top creates the crucial connection point that holds your entire structure together.
Twine, jute, or thin rope works excellently for lashing poles together securely at the apex. We wrap the binding material multiple times around the gathered pole tops, creating tight knots that won’t slip under tension. Standing the bound structure upright allows us to spread the poles evenly apart, forming the classic teepee shape.
Securing the base involves slightly burying the bottom of each pole into the soil for added stability against wind and plant weight. We push each pole approximately 2 to 3 inches into the ground, creating anchor points that prevent the structure from shifting during the growing season.
Maintenance and Longevity Tips
Regular inspections keep bamboo teepee trellises functioning properly throughout multiple growing seasons. We check our structures monthly for signs of damage, wear, or loosening bindings that could compromise plant support. Examining the binding points helps identify areas where twine or rope might need reinforcement or replacement.
Storage extends the lifespan of bamboo trellises significantly when properly managed during off seasons. We fold down our bamboo structures carefully and store them in dry locations away from moisture and extreme temperatures. Proper storage prevents unnecessary weathering and maintains structural integrity for years of reliable use.
Environmental protection through protective coatings helps bamboo resist rot and weather damage naturally. We apply wood preservative or clear outdoor sealant to our bamboo poles before initial installation, creating barriers against moisture penetration. Reapplying protective treatments every two to three years maintains the bamboo’s natural resistance to decay and insect damage.
Metal Obelisk Trellis for Elegant Vertical Gardens

Metal obelisk trellises bring sophistication and structural elegance to any garden space. These stunning vertical supports transform ordinary climbing plants into breathtaking garden features that capture attention from every angle.
Design Styles and Height Options
Material choices for metal obelisk trellises include durable wrought iron and galvanized steel, ensuring long-lasting performance in outdoor conditions. We’ve found that wrought iron offers timeless elegance while galvanized steel provides excellent rust resistance for harsh weather exposure.
Style variations cover wirework, round, rose, basket, half, inverted, and tricorn obelisks that cater to different aesthetic preferences. Unique finial designs like round, spiral, or orb shapes add distinctive character to each obelisk style.
Height flexibility allows gardeners to choose from compact designs for smaller spaces to towering structures that create dramatic vertical interest. We recommend selecting heights that complement your garden’s scale and the mature size of your chosen climbing plants.
| Obelisk Style | Best Height Range | Ideal Garden Setting |
|---|---|---|
| Wirework | 6-8 feet | Formal gardens |
| Rose | 7-10 feet | Romantic landscapes |
| Basket | 5-7 feet | Cottage gardens |
| Tricorn | 8-12 feet | Statement pieces |
Installation in Different Soil Types
Solid base preparation prevents obelisk toppling by digging deeper holes and filling them with compacted soil for maximum stability. We always recommend creating a foundation that extends at least 18 inches below ground level for tall obelisks.
Concrete base installation provides additional stability in areas with loose or sandy soil conditions. Mixing concrete directly in the hole creates a permanent anchor point that withstands strong winds and heavy plant loads.
Soft soil reinforcement requires additional anchoring with stakes or guy wires to maintain vertical positioning. We’ve successfully used metal stakes driven at angles around the obelisk base to create a stable tripod effect in challenging soil conditions.
Decorative Plant Combinations
Vigorous climbing plants like morning glories, sweet peas, and clematis thrive on metal obelisk support systems. These fast-growing vines quickly cover the structure while producing abundant blooms throughout the growing season.
Rose obelisks showcase climbing roses beautifully, creating stunning vertical displays of color and fragrance. We particularly recommend pairing light-colored roses with dark metal obelisks for striking visual contrast.
Mixed plantings combine flowering climbers with foliage-rich plants to create diverse, textured garden displays. Successful combinations include clematis with climbing hydrangea or morning glories paired with decorative gourds for seasonal interest.
Seasonal layering involves planting early bloomers like sweet peas at the base while training late-season climbers higher up the structure. This technique ensures continuous color and visual appeal from spring through fall harvest time.


String and Stake Trellis for Budget-Friendly Solutions

When budget constraints limit our garden projects, string and stake trellises offer an incredibly cost-effective solution that doesn’t sacrifice functionality. We can create these versatile support systems using simple materials that most gardeners already have on hand.
Essential Materials and Setup
Basic supplies for our string and stake trellis include wooden stakes, bamboo poles, or even repurposed branches along with sturdy twine or garden wire. We’ll need stakes that are at least 6 feet tall to provide adequate support for climbing plants like tomatoes, which tend to grow vigorously throughout the season.
Installation process begins by driving our stakes 12 to 18 inches deep into the ground around the perimeter of our planting area. We space the stakes approximately 3 to 4 feet apart to ensure even support distribution across our garden bed.
Creating the framework involves weaving twine or wire in a crisscross pattern between our installed stakes. We start at the bottom, working our way up in 6-inch intervals to create horizontal support lines that guide plant growth upward.
Reinforcement techniques help us strengthen high-stress connection points by wrapping extra twine around stake intersections. We tie secure knots at each junction to prevent the framework from loosening under plant weight or wind pressure.
Tensioning Techniques for Stability
Proper tensioning ensures our string and stake trellis maintains structural integrity throughout the growing season. We pull each string line taut but avoid over-tightening, which can snap the twine or bend our stakes under excessive pressure.
Progressive tightening works best when we adjust tension gradually as plants begin to climb and add weight to the structure. We check our framework weekly during peak growing periods and make small adjustments to maintain optimal support.
Wind resistance improves when we angle our perimeter stakes slightly outward, creating a more stable base that withstands gusty conditions. We also add diagonal support strings between opposite corners to prevent the entire structure from swaying.
Load distribution becomes critical as our climbing plants mature and produce fruit. We install additional horizontal support lines in areas where plants appear heaviest to spread the weight across multiple connection points.
Seasonal Adjustment Methods
Spring preparation involves installing fresh trellises or repairing winter-damaged frameworks before our climbing plants begin their active growth phase. We replace any rotted stakes and retie loose string connections to ensure reliable support from the start.
Summer maintenance requires regular trimming of overgrown vines that might overwhelm our trellis structure. We guide new growth along existing support lines and add supplementary strings where plants need additional guidance.
Fall securing helps us protect our investment by tightening any loose connections and reinforcing areas that showed stress during the growing season. We remove dead plant material that could harbor pests or diseases over winter.
Winter protection extends our trellis lifespan when we carefully dismantle temporary string connections while leaving permanent stakes in place. We store reusable twine in a dry location and inspect stakes for damage that needs addressing before next season.
Living Willow Trellis for Eco-Friendly Growing

Living willow trellises offer gardeners a sustainable alternative that grows stronger over time. We’re creating a biodegradable support system that enriches our garden’s network while providing excellent structural support for climbing plants.
Harvesting and Preparing Willow Branches
Timing matters when harvesting willow branches for our eco-friendly trellis. January and February represent the optimal dormant season window for cutting willow branches, ensuring maximum viability for our project. Fresh cuttings need immediate planting in well-watered soil to establish successful root systems.
Selection criteria focus on branch thickness and flexibility. We choose branches that bend easily without breaking, typically measuring between half an inch to one inch in diameter. Young willow shoots work best for weaving patterns, while thicker branches provide structural framework support.
Preparation involves cutting branches at 45-degree angles. Sharp, clean cuts promote healthy root development when we plant our willow cuttings directly into the ground. Soaking cut ends in water for 24 hours before planting increases our success rate significantly.
Weaving Patterns and Techniques
Diamond patterns create the most stable foundation for our living willow trellis. We plant vertical posts first, spacing them 12 to 18 inches apart to accommodate our chosen climbing plants. Crosshatch weaving follows, creating intersecting points that strengthen as the willow grows.
Immediate weaving after planting prevents branch drying and breakage. Flexible branches allow us to create tight patterns while the wood remains pliable from recent cutting. We secure crossing points with biodegradable ties that decompose as the willow strengthens naturally.
Spiral weaving techniques work well for curved trellis designs. Starting from the bottom, we wrap branches around vertical supports in ascending spirals. Multiple layers create density while maintaining the organic flow that makes living willow trellises unique garden features.
Long-term Care and Growth Management
Consistent watering ensures our living willow trellis thrives throughout establishment. Willow requires moisture-rich soil conditions, especially during the first growing season when roots develop. We maintain soil moisture levels similar to what we’d provide for thirsty vegetable crops.
Annual pruning maintains our trellis shape and promotes healthy growth patterns. Electric hedge trimmers make quick work of trimming excess growth that extends beyond our desired structure. We prune during late winter before new growth begins, removing dead or overcrowded branches.
New growth integration strengthens our trellis structure over multiple seasons. We weave fresh shoots into existing patterns as they emerge, creating an increasingly solid support system. Regular shaping throughout the growing season prevents our willow trellis from becoming overgrown while maintaining its functional beauty.
Biodiversity benefits increase as our living trellis matures. Birds nest in the dense growth, beneficial insects find shelter, and the root system improves soil health around our climbing plants. We’re creating a mini network that supports both our garden plants and local wildlife populations.

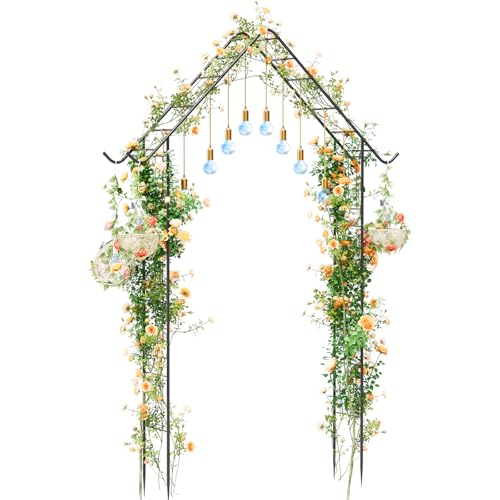
Arched Trellis Gateway for Garden Entrances

An arched trellis gateway transforms any garden entrance into a stunning focal point that welcomes visitors with natural elegance. This sophisticated structure combines the practical benefits of vertical growing space with the visual impact of an architectural garden feature.
Design Planning and Measurements
Planning your arched gateway dimensions ensures proper scale and functionality for your garden entrance. We recommend heights between 6 to 8 feet to create an inviting passageway while allowing adequate clearance for most adults. Width measurements of 4 to 6 feet provide comfortable access without overwhelming smaller garden spaces.
Ground preparation requires measuring at least 2 feet beyond each side of your planned arch for proper vine spreading and maintenance access. Deep installations need concrete footings extending 18 to 24 inches below ground level for maximum stability. Consider your garden’s existing pathways and sight lines when positioning the gateway to enhance rather than obstruct natural flow patterns.
Weather conditions in your area influence material choices and structural reinforcement needs. Heavy snow loads require stronger framing, while high wind areas benefit from additional ground anchoring systems.
Construction Methods and Materials
Frame construction begins with selecting durable materials that withstand outdoor conditions year round. Cedar and pressure treated lumber offer excellent weather resistance for wooden arches, while galvanized steel provides long lasting metal framework options. We prefer using 4×4 inch posts for the vertical supports and 2×6 inch boards for creating the curved arch sections.
Concrete footings secure the vertical posts with quick setting concrete mix that cures within 24 hours. Dig post holes approximately 2 feet deep and 8 inches wide for proper foundation support. Create the arch shape by cutting multiple curved sections from your chosen lumber and joining them with galvanized carriage bolts.
Trellis panel attachment involves mounting either wooden lattice or welded wire mesh between the frame members. Stainless steel screws resist rust and provide stronger connections than standard fasteners. Apply exterior wood stain or metal primer before assembly to protect materials from moisture damage.
Decorative elements like scrollwork or carved details add personalized touches that complement your garden’s overall design theme.
Flowering Vine Recommendations
Clematis varieties produce spectacular blooms in purple, pink, white, and blue throughout the growing season. Large flowered cultivars like ‘Jackmanii’ and ‘Nelly Moser’ create dramatic displays on arch structures. These vines prefer cool root zones with mulched soil and full sun exposure on their foliage.
Climbing roses transform gateways into fragrant passages with classic appeal and seasonal interest. ‘Eden’ and ‘New Dawn’ roses offer repeat blooming cycles and disease resistance for reliable performance. Prune these roses annually to maintain shape and encourage new flowering wood development.
Jasmine species provide intensely fragrant star shaped flowers that perfume evening garden walks. Confederate jasmine and winter jasmine adapt well to various climate zones while offering different blooming periods. Train these vigorous climbers carefully to prevent overwhelming the trellis structure.
Sweet pea annuals deliver delicate, fragrant blooms in soft pastels perfect for romantic garden themes. Plant these cool season vines in early spring for extended flowering before summer heat arrives. Successive sowings every 2 weeks extend the blooming period throughout the growing season.
Morning glories open fresh blooms each day in vibrant blues, purples, and whites that attract beneficial pollinators. These fast growing annuals quickly cover new trellis installations while requiring minimal maintenance care.


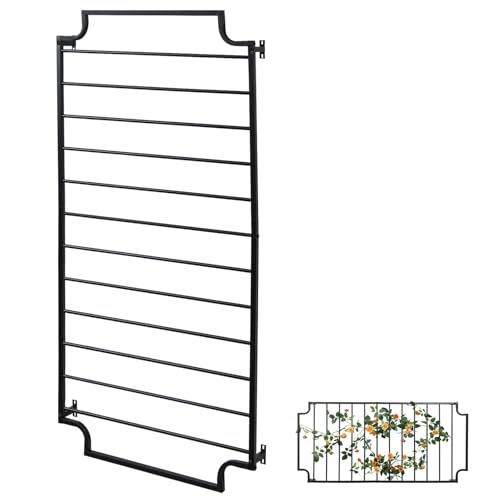
Wall-Mounted Trellis Systems for Small Spaces

Wall-mounted trellises transform vertical surfaces into productive growing areas, making them perfect for maximizing limited garden or patio spaces. These space-efficient systems attach directly to walls and provide excellent support for climbing plants such as vines, roses, and vegetables.
Space-Saving Design Options
Slim profile grids offer the most compact solution for tight spaces without sacrificing growing capacity. We recommend modular panels that allow you to customize the size and configuration based on your exact wall dimensions and plant needs.
Folding and retractable panels provide flexibility for seasonal use and easy storage during winter months. These innovative designs work exceptionally well on balconies and window frames where permanent installations aren’t always practical.
Compact trellis shapes include fan, ladder, and grid patterns that cater to different plant types and aesthetic preferences. Vertical gardens created with wall trellises reduce your ground footprint while doubling as privacy screens or decorative elements for plain surfaces.
| Design Type | Best Use | Space Efficiency |
|---|---|---|
| Slim Profile Grids | Tight spaces | Maximum |
| Modular Panels | Custom configurations | High |
| Folding Panels | Seasonal/temporary | Variable |
| Fan Patterns | Decorative plants | Medium |
Proper Wall Attachment Methods
Corrosion resistant hardware ensures your wall-mounted trellis system remains stable and secure for years. We always recommend checking that your wall material can adequately support both the trellis weight and the mature plants it’ll hold.
Multiple anchor points distribute the load evenly and prevent structural failure as plants grow heavier throughout the season. Masonry anchors work best for brick walls, while plastic anchors suit drywall installations effectively.
Robust brackets provide the strongest connection for wooden surfaces and can handle the ever-changing loads created by wind and plant movement. Leave a small gap between the trellis and wall to ensure proper airflow and prevent moisture buildup that could damage your structure.
Container Gardening Integration
Planters positioned at the base of wall trellises create an integrated growing system that’s both functional and attractive. We’ve found that mounting containers directly onto specially designed panels offers the ultimate space-saving solution for compact areas.
Lightweight containers with well-draining soil optimize your vertical gardening setup while making maintenance tasks much easier. This arrangement allows you to experiment with different plant combinations and relocate containers as your garden evolves.
Mobile container systems provide the flexibility to adjust your garden layout based on sunlight patterns and seasonal changes. Easy plant maintenance becomes possible when you can access containers without disturbing the trellis structure or other plants.

Conclusion
We’ve explored countless ways to transform your garden with creative trellis answers that fit every budget and style preference. From rustic bamboo teepees to elegant metal obelisks these vertical growing systems offer practical support while improving your garden’s visual appeal.
The beauty of garden trellises lies in their versatility – whether you’re working with limited space or sprawling grounds there’s a perfect option waiting for you. Each design we’ve covered brings unique benefits that’ll help you maximize harvests and create stunning focal points.
Remember that the best trellis is one that matches your exact growing needs and complements your garden’s existing aesthetic. With proper installation and maintenance any of these structures will serve you well for seasons to come while adding both function and charm to your outdoor space.
Frequently Asked Questions
What are the benefits of using trellises in my garden?
Trellises maximize growing space by supporting climbing plants vertically, allowing you to grow more in less ground area. They improve air circulation around plants, reducing disease risk, and make harvesting easier. Additionally, trellises add visual appeal and structure to your garden while creating attractive focal points that can enhance your overall landscape design.
Which materials are best for DIY trellis construction?
Cedar and pressure-treated lumber are excellent choices for wooden trellises due to their durability and weather resistance. For metal options, galvanized steel and wrought iron offer longevity and strength. Bamboo provides an eco-friendly alternative, while wire mesh panels offer versatility and cost-effectiveness for supporting various climbing plants.
How do I build a simple A-frame trellis?
Cut cedar boards to desired lengths, assemble two triangular frames using wood screws, then connect them with cross-supports. Attach wire mesh or chicken wire to both sides for plant support. Ensure the base is wide enough for stability, and consider burying the legs slightly in soil for added security.
What plants work best with trellis systems?
Pole beans, peas, cucumbers, and tomatoes are excellent for vegetable gardens. For ornamental purposes, try climbing roses, clematis, morning glories, jasmine, and sweet peas. Choose plants based on your trellis strength – lighter vines for bamboo or string systems, heavier fruiting plants for sturdy wooden or metal structures.
How can I repurpose old ladders as garden trellises?
Clean and inspect old ladders for stability, then apply weatherproof sealant or paint. Position them vertically against walls or create freestanding displays. Use rungs to support climbing plants, or add wire mesh between sides. Vintage wooden ladders add rustic charm, while metal ones provide modern appeal.
What’s the most budget-friendly trellis option?
String and stake trellises are the most economical choice. Simply drive wooden stakes into the ground and string twine or wire between them in your desired pattern. This method costs under $20 for most garden areas and works excellently for lightweight climbing plants like peas and beans.
How do I maintain my trellis structures?
Inspect trellises seasonally for damage, loose connections, or wear. Clean off plant debris after harvest, tighten any loose screws or ties, and apply protective coatings annually to wooden structures. Store removable trellises indoors during harsh winter weather to extend their lifespan and maintain structural integrity.
Can I use trellises in small spaces or containers?
Absolutely! Wall-mounted trellis systems, compact obelisks, and string trellises work perfectly in small spaces. Combine them with container gardening for patios, balconies, or small yards. Modular panels and folding designs offer flexibility, allowing you to maximize vertical growing space even in the tiniest garden areas.