When winter temperatures drop we’re faced with a challenging decision: let our beloved plants struggle through the cold or rack up enormous heating bills. There’s a smarter solution that most gardeners overlook – proper greenhouse insulation.
We’ve discovered that insulating your greenhouse isn’t just about keeping plants warm. It’s about creating a stable environment that protects your investment while slashing energy costs by up to 50%. Whether you’re growing tomatoes in January or nurturing delicate seedlings through harsh weather proper insulation transforms your greenhouse into a year-round growing powerhouse.
The best part? You don’t need expensive contractors or complex installations. With the right materials and techniques we’ll show you how to turn your greenhouse into an efficient growing sanctuary that works harder for less money. Let’s jump into the proven methods that’ll keep your plants thriving while your wallet stays happy.
Materials and Tools Needed
Gathering the correct materials and tools before starting ensures a smooth insulation process. We’ve organized everything into three categories to make your preparation efficient.
Insulation Materials
Bubble wrap insulation provides the most cost-effective solution for greenhouse insulation projects. Roll widths of 24 inches or 48 inches work best for standard greenhouse panels. Horticultural grade bubble wrap lasts 3-4 years longer than standard packaging materials.
Polycarbonate panels offer superior thermal performance with R-values between 1.5 and 2.0. Twin-wall panels measuring 6mm thick provide excellent insulation while maintaining 80% light transmission. These panels resist impact damage and withstand temperature fluctuations better than glass alternatives.
Thermal screens create movable insulation systems that adjust based on weather conditions. Aluminized polyester screens reflect up to 95% of radiant heat back into the greenhouse. Energy-saving screens like these reduce heating costs by 30-40% during winter months.
Weatherstripping materials seal gaps and prevent heat loss through cracks. Foam tape strips work effectively on door frames and window joints. Silicone caulk fills larger gaps around vents and structural connections permanently.
Installation Tools
Measuring tape ensures accurate material cuts and proper panel sizing. A 25-foot tape measure handles most greenhouse dimensions effectively. Double-sided tape dispensers speed up bubble wrap installation on glass surfaces.
Utility knives with replaceable blades cut through insulation materials cleanly. Heavy-duty scissors work better for cutting thermal screens and fabric materials. Snap-off blade knives maintain sharp cutting edges throughout extended projects.
Staple guns attach insulation materials to wooden greenhouse frames securely. Electric staple guns drive 1/4-inch staples through multiple material layers consistently. Manual staplers work adequately for lighter materials like bubble wrap.
Drill with bits creates mounting holes for panel clips and fasteners. Cordless drills with 12V batteries provide sufficient power for most greenhouse installation tasks. Pilot holes prevent cracking in polycarbonate and acrylic materials.
Safety Equipment
Safety glasses protect eyes from debris during cutting and drilling operations. Wraparound styles provide better peripheral protection than standard frames. Anti-fog coatings maintain clear vision in humid greenhouse environments.
Work gloves prevent cuts from sharp material edges and metal fasteners. Nitrile-coated gloves offer better grip on smooth surfaces while maintaining dexterity. Cut-resistant gloves rated Level 2 protection handle glass and metal materials safely.
Dust masks filter airborne particles when cutting insulation materials. N95 respirators block 95% of particles larger than 0.3 microns effectively. Disposable masks work adequately for single-day projects with minimal dust exposure.
Knee pads reduce joint stress during ground-level installation work. Gel-filled pads distribute weight more evenly than foam alternatives. Adjustable straps keep pads positioned correctly during extended work periods.
Understanding Greenhouse Insulation Basics
 1")
Greenhouse insulation creates a thermal barrier that controls temperature fluctuations and optimizes growing conditions year-round. Understanding these fundamentals ensures we select the right materials and techniques for maximum efficiency.
Why Insulation Matters
Energy efficiency drives the primary benefit of greenhouse insulation by reducing heating and cooling costs through prevented heat transfer. TekFoil Clear Bubble Insulation demonstrates this principle by cutting heating expenses up to 35% during winter months.
Plant health improves dramatically when consistent temperatures eliminate stress from temperature swings. Stable environments promote stronger root development and increased yields across all plant varieties.
Cost savings accumulate over time as effective insulation systems pay for themselves through reduced energy bills. Thermal insulation quilts exemplify long-term value by cutting energy costs up to 70% while lasting 10 years with proper maintenance.
Types of Greenhouse Insulation
Bubble insulation materials offer versatile answers for different greenhouse configurations:
- TekFoil Clear Bubble Insulation provides year-round temperature control with 35% heating cost reduction
- TekFoil Reflective Insulation traps warm air effectively while reducing radiant heat transfer
- Standard bubble wrap delivers budget-friendly insulation for basic temperature regulation
Rigid insulation panels deliver superior thermal performance for permanent installations:
- Polycarbonate panels combine insulation properties with light transmission
- Thermal insulation foil reduces heat transfer in extreme cold conditions
- Spray foam insulation seals lower walls completely for enhanced thermal barriers
Flexible insulation systems adapt to changing seasonal requirements:
- Thermal insulation quilts provide removable coverage with maximum energy savings
- Reflective screens redirect heat while maintaining light access
- Moveable thermal barriers allow temperature customization by zone
When to Insulate Your Greenhouse
Fall through spring installation maximizes energy efficiency during peak heating months when temperature differentials create the greatest heat loss. Cold weather insulation becomes critical once nighttime temperatures drop below 45°F consistently.
Year-round applications benefit certain greenhouse operations through thermal regulation materials like quilts and screens. Thermal insulation quilts regulate temperature fluctuations during summer heat waves while maintaining their winter heating benefits.
Seasonal removal applies to temporary insulation materials that reduce light transmission during peak growing periods. Bubble wrap installations typically get removed in late spring to maximize photosynthesis for summer crops.
Preparing Your Greenhouse for Insulation
 2")
Proper preparation forms the foundation for effective greenhouse insulation. Creating an optimal thermal environment begins with thorough assessment and accurate planning.
Cleaning and Inspecting the Structure
Clean all surfaces thoroughly before beginning the insulation process. Remove debris, dirt, and plant residue from walls, roof panels, and foundation areas to ensure proper material adhesion.
Examine the entire framework for structural damage or wear. Look for bent supports, loose connections, and corroded hardware that could compromise insulation effectiveness.
Inspect glazing materials for cracks, chips, or damaged seals. Replace broken panels and repair minor damage using appropriate greenhouse sealants to prevent future heat loss.
Check foundation stability and verify that the structure sits level. Uneven foundations create gaps that allow heated air to escape regardless of insulation quality.
Document problem areas using photos or notes for reference during material installation. This systematic approach prevents overlooking critical repair points.
Identifying Heat Loss Areas
Locate primary heat escape points around windows, doors, and ventilation systems where temperature differentials create energy loss. These areas account for 40-60% of total heat loss in typical greenhouse structures.
Test for air leaks using smoke pencils or incense sticks near suspected problem zones. Moving smoke indicates air movement and potential insulation priorities.
Focus on glazing connections where panels meet the frame structure. Gaps as small as 1/8 inch can significantly impact thermal efficiency and heating costs.
Examine door and window seals for compression and flexibility. Hardened or cracked weatherstripping loses sealing capability and requires replacement before insulation installation.
Check foundation perimeters where the structure meets ground level. Cold air infiltration through these areas creates drafts that reduce overall insulation performance.
Measuring for Materials
Calculate total square footage for each surface requiring insulation treatment. Measure wall heights, roof dimensions, and door areas separately to determine exact material quantities.
Record measurements in a detailed diagram showing dimensions for walls, roof sections, and specialty areas. Include window and door openings to subtract from total coverage calculations.
Account for material overlap by adding 10-15% to final measurements. Bubble wrap insulation requires 2-3 inch overlaps while rigid panels need precise fitting with minimal gaps.
Determine fastener quantities based on installation spacing requirements. Bubble wrap installations typically require fasteners every 12-18 inches while rigid panels need support every 24 inches.
Create a materials list organized by installation sequence to streamline the purchasing process and ensure complete coverage without material shortages.
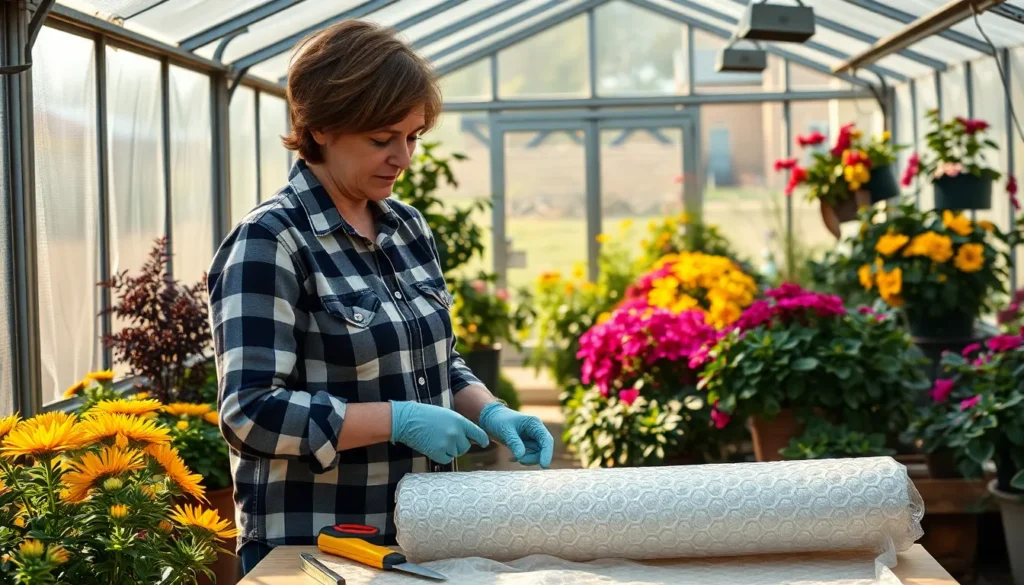
Installing Bubble Wrap Insulation
 3")
Installing bubble wrap insulation provides one of the most cost-effective methods for reducing greenhouse heat loss by up to 35%.
Cutting and Preparing Bubble Wrap
Measure each glass panel’s dimensions before cutting bubble wrap to ensure accurate coverage. Cut the bubble wrap approximately 2 inches wider and taller than each panel measurement to allow for proper overlap. Position the bubble side of the wrap facing toward the glass surface for maximum thermal retention. Clean the bubble wrap surface with a damp cloth to remove manufacturing residue that might interfere with adhesion. Roll the cut pieces loosely to prevent creasing during installation.
Attaching to Glass Panels
Spray a light mist of water onto the glass surface before positioning the bubble wrap against each panel. Press the bubble wrap firmly against the glass starting from one corner and working across to eliminate air pockets. Use greenhouse clips spaced every 12 inches along the edges to secure the material in place. Double-sided greenhouse tape provides additional holding power for areas where clips cannot reach effectively. Work systematically from top to bottom panels to maintain consistent coverage across the entire greenhouse structure.
Sealing Edges and Corners
Apply clear silicone caulk along all edges where bubble wrap meets the greenhouse frame to prevent air gaps. Use a caulk gun to create consistent beading that fills gaps between the insulation material and structural elements. Smooth the caulk lines with a damp finger within 5 minutes of application for professional appearance. Additional strips of double-sided tape reinforce corner connections where bubble wrap pieces overlap. Check all sealed areas by running your hand along edges to detect any remaining air leaks that require additional sealing.


Adding Rigid Foam Board Insulation
 4")
Rigid foam board insulation provides superior thermal performance compared to bubble wrap systems and creates a more permanent insulation solution for your greenhouse structure.
Measuring and Cutting Foam Boards
Accurate measurements ensure proper foam board coverage without wasteful gaps or overlaps. Start by measuring each wall section and roof panel individually rather than estimating total square footage. Record the exact dimensions of each surface including window and door openings that require cutouts.
Cut foam boards using a sharp utility knife and straight edge for clean precise lines. Score the foam surface multiple times rather than attempting to cut through in a single pass. Break the board along the scored line by applying gentle pressure from both sides.
Create templates from cardboard for irregular shapes like curved roof sections or angled corners. Transfer these templates to the foam boards before cutting to achieve accurate fits around complex greenhouse features.
Installing on Walls and Roof
Begin wall installation at the bottom corner and work systematically upward to prevent foam boards from shifting during attachment. Press each board firmly against the greenhouse frame while checking for complete surface contact along all edges.
Position roof boards starting from the lowest point and overlapping each subsequent row by 2 inches to prevent water infiltration. The overlapping pattern directs moisture away from seams and maintains thermal continuity across the entire roof surface.
Check each installed board for proper alignment before moving to the next section. Misaligned boards create thermal bridges that reduce overall insulation effectiveness and compromise the greenhouse climate control system.
Securing with Adhesive and Fasteners
Apply construction adhesive in a zigzag pattern across the back surface of each foam board before installation. Polyurethane adhesive provides the strongest bond for greenhouse applications and maintains flexibility during temperature fluctuations.
Drive screws through pre-drilled holes spaced 16 inches apart along board edges and 24 inches apart across interior sections. Use screws with large washers to distribute load and prevent the fastener heads from pulling through the foam material.
Seal all joints between foam boards using expanding foam sealant or caulk designed for exterior applications. Fill gaps completely but avoid over-application that creates bulges or uneven surfaces affecting the greenhouse appearance.
Insulating the Greenhouse Foundation
 5")
Foundation insulation creates the critical thermal barrier between your greenhouse and the cold ground beneath. Proper foundation insulation reduces ground heat loss by up to 40%, forming the cornerstone of an efficient greenhouse heating system.
Excavating Around the Perimeter
Begin excavation 18 to 24 inches from the foundation walls to create adequate working space. Dig down to expose the full depth of your foundation, typically extending 2 to 3 feet below ground level depending on your local frost line requirements.
Mark utility lines before breaking ground to prevent costly damage during excavation. Clear vegetation and debris from the work area, creating a clean perimeter around the entire greenhouse structure.
Remove soil in manageable sections, placing excavated earth away from the work zone for easier backfilling later. Check foundation walls for cracks or damage as you expose them, noting any repairs needed before insulation installation.
Installing Underground Insulation
Select rigid foam board insulation rated for underground use with an R-value between 5 and 10 per inch thickness. Cut insulation boards to match the exposed foundation height, allowing boards to extend from the foundation base to ground level.
Apply construction adhesive in a zigzag pattern across the back of each insulation board. Press boards firmly against the foundation wall, ensuring complete contact and eliminating air gaps between the insulation and concrete surface.
Overlap board joints by 1 inch to prevent thermal bridging through seams. Secure boards with masonry anchors every 18 inches along the perimeter, driving anchors flush with the insulation surface.
Seal all joints between insulation boards using expanding foam sealant designed for outdoor applications. Trim excess foam after curing to create a smooth, continuous insulation barrier.
Backfilling and Waterproofing
Apply waterproofing membrane over the insulation surface before backfilling to protect against moisture infiltration. Use liquid rubber coating or adhesive membrane sheets, covering the entire insulated area from top to bottom.
Backfill with clean, compactable soil in 6-inch lifts to prevent settling and maintain proper drainage away from the foundation. Compact each soil layer using a hand tamper, ensuring uniform density without damaging the insulation or waterproofing.
Install a French drain system around the perimeter if your greenhouse sits in an area prone to water accumulation. Grade the final soil surface to slope away from the foundation at a minimum 2% grade for proper water runoff.


Weatherproofing Doors and Vents
 6")
Sealing gaps around doors and vents prevents cold air infiltration and maintains the thermal efficiency of your insulated greenhouse structure.
Installing Weather Stripping
Apply weather stripping around door frames to create an airtight seal between moving parts and stationary surfaces. Measure the perimeter of each door frame and cut the weather stripping material to fit exactly. Clean the door frame surface with a damp cloth to remove dirt and debris that could prevent proper adhesion.
Position the weather stripping along the door jamb where the door meets the frame when closed. Press the adhesive backing firmly against the clean surface, ensuring continuous contact without gaps. Test the door closure to confirm the weather stripping compresses properly without binding the door operation.
Replace worn weather stripping annually to maintain effective sealing performance. Check for tears, compression loss, or adhesive failure during routine greenhouse maintenance. Select weather stripping materials rated for outdoor temperature fluctuations to ensure longevity.
Adding Door Sweeps
Install door sweeps at the bottom of entrance doors to eliminate the gap between the door and threshold. Measure the door width and cut the door sweep to match this dimension exactly. Remove any existing threshold sealing before installing the new door sweep.
Attach the door sweep using the provided screws through the pre-drilled holes in the sweep mounting bracket. Position the sweep so the flexible sealing strip touches the threshold when the door closes completely. Adjust the mounting height to achieve firm contact without excessive friction during door operation.
Choose adjustable door sweeps for greenhouse doors that may settle or shift over time. These sweeps allow fine tuning of the sealing contact without removing and reinstalling the entire unit. Test door operation after installation to ensure smooth opening and closing.
Sealing Vent Gaps
Inspect all ventilation openings for gaps that allow uncontrolled air exchange and heat loss. Use caulking compound for gaps smaller than 1/4 inch around vent frames and louvers. Apply expanding foam sealant for larger gaps exceeding 1/4 inch to achieve complete air sealing.
Check automatic vent openers for proper sealing when in the closed position. Adjust the vent arm tension to ensure complete closure against the vent frame. Add foam weatherstripping around the vent opening if gaps remain after adjustment.
Seal ridge vents and roof vents using appropriate weatherproofing materials for each vent type. Apply butyl tape around vent flanges before installation to create watertight and airtight seals. Inspect these seals twice annually and reapply sealant as needed to maintain effectiveness.

Creating Thermal Mass Solutions
 7")
Thermal mass materials absorb heat during sunny periods and release warmth gradually when temperatures drop. Water has one of the highest exact heat capacities among practical materials, making it exceptionally effective for temperature stabilization.
Adding Water Barrels
Water barrels provide an excellent thermal mass solution that absorbs solar energy during daylight hours and releases stored heat throughout the night. Dark-colored barrels absorb heat more efficiently than light-colored containers. Position multiple 55-gallon drums throughout the greenhouse interior to maximize heat storage capacity.
Fill barrels completely to eliminate air pockets that reduce thermal efficiency. Black plastic barrels work optimally for heat absorption, while blue or green containers offer moderate performance. Metal drums conduct heat faster but may rust in humid greenhouse conditions.
Place barrels where direct sunlight reaches them for at least 6 hours daily. Space containers 3-4 feet apart to ensure adequate air circulation around each barrel. Stack smaller containers like 5-gallon buckets when floor space limits large barrel placement.
Installing Stone or Concrete Features
Stone and concrete features create permanent thermal mass that stabilizes interior temperatures while providing functional growing surfaces. Concrete raised beds offer dual benefits of thermal regulation and organized planting areas. Natural stone walls absorb heat during warm periods and radiate warmth when ambient temperatures decline.
Build concrete raised beds using standard concrete mix with a minimum thickness of 4 inches for effective thermal mass. Construct stone walls along the interior perimeter using materials like flagstone, river rock, or concrete blocks. Paint concrete surfaces dark colors to enhance heat absorption properties.
Install concrete pavers or stone flooring to replace standard dirt floors. These surfaces absorb solar radiation and release heat gradually overnight. Choose materials with high thermal mass properties such as granite, slate, or dense concrete products.
Positioning for Maximum Heat Storage
Strategic placement of thermal mass materials maximizes heat collection and distribution throughout the greenhouse space. Position water barrels and stone features where they receive maximum sunlight exposure between 10 AM and 3 PM when solar radiation peaks.
| Material Type | Optimal Position | Heat Storage Duration |
|---|---|---|
| Water barrels | South-facing interior walls | 8-12 hours |
| Stone features | Central floor area | 6-10 hours |
| Concrete raised beds | East-west orientation | 10-14 hours |
Avoid placing thermal mass materials where they cast shadows on growing plants. North walls benefit from insulation rather than thermal mass placement since they receive minimal direct sunlight. Center placement allows heat distribution in all directions while south-facing positions capture maximum solar energy.
Keep thermal mass features away from ventilation areas where air movement reduces heat retention efficiency. Group multiple thermal mass elements together to create heat storage zones that maintain warmth longer than isolated components.
Installing Temporary Winter Insulation
 8")
Temporary winter insulation provides greenhouse protection during cold months while maintaining flexibility for warmer seasons. This approach allows us to maximize thermal efficiency when plants need it most without compromising growing conditions year-round.
Setting Up Removable Panels
Polycarbonate panels deliver superior thermal insulation while allowing essential sunlight transmission for plant growth. Installing these panels involves measuring each greenhouse section accurately and cutting panels to fit with 1-inch overlap for weather sealing. Position panels starting from the bottom section and work upward to ensure proper water runoff.
Securing polycarbonate panels requires aluminum H-channel connectors at panel joints and U-channel edging along perimeter cuts. Drill pilot holes every 18 inches to prevent cracking during installation and use appropriate screws with rubber washers to create weatherproof seals.
Thermal foil lining reflects interior heat effectively and maintains warmth during winter months while providing cooling benefits in summer. Attach foil directly to greenhouse frame using heavy-duty staples or adhesive strips positioned every 12 inches along the perimeter. Create smooth surfaces by pulling foil taut during installation to maximize reflective efficiency.
Using Greenhouse Plastic Sheeting
Double layering plastic creates enhanced insulation through trapped air spaces between material layers. Cut greenhouse plastic 6 inches larger than each panel dimension to ensure adequate overlap for secure attachment. Install the first layer directly against glass panels using spring wire or greenhouse clips placed every 8 inches.
Adding the second plastic layer requires creating a 2-4 inch air gap from the first layer using spacer strips or inflation systems. Inflated air space between plastic layers significantly improves insulation performance by up to 40% compared to single-layer applications.
Blower fan systems maintain consistent air pressure between plastic layers and prevent collapse during wind events. Connect a small squirrel cage fan to the air space through a sealed entry point and operate continuously at low speed to maintain proper inflation.
Creating Air Gaps for Better Insulation
Sealing gaps eliminates heat loss points that compromise overall greenhouse efficiency. Inspect foundation joints, door frames, and ventilation connections for air leaks using incense sticks or smoke pencils to identify problem areas. Apply weatherproof caulk or expanding foam sealant to gaps measuring 1/4 inch or smaller.
Air gaps between insulation layers enhance thermal resistance by creating dead air spaces that reduce convective heat transfer. Install furring strips or spacer materials to maintain consistent 1-2 inch gaps between insulation layers and greenhouse surfaces. Position spacers every 24 inches vertically and horizontally to prevent insulation compression.
Bubble wrap installations benefit from maintaining air gaps between the material and glass surfaces to maximize insulation effectiveness. Spray glass panels lightly with water and press bubble wrap against surfaces with bubbles facing the glass to create optimal air pockets. Overlap bubble wrap sections by 2 inches and secure edges with clear tape to prevent air infiltration.
Troubleshooting Common Issues
 9")
Even well-insulated greenhouses face common challenges that affect plant health and energy efficiency. Proper troubleshooting ensures optimal growing conditions year-round.
Dealing with Condensation Problems
Excessive condensation causes plant diseases and reduces light transmission through glazing materials. We identify condensation buildup on interior surfaces as the primary indicator of humidity imbalance within insulated greenhouse environments.
Installing vented or capped ends on polycarbonate panels eliminates moisture trapped between glazing layers. These specialized end caps allow air circulation while maintaining insulation properties throughout winter months.
Controlling humidity levels requires adequate ventilation to prevent fungal growth on plant surfaces. We recommend maintaining relative humidity between 60-70% during daylight hours and 80-85% at night for optimal plant health.
Positioning exhaust fans near the ridge line removes warm moisture-laden air before condensation forms on cool surfaces. Strategic placement of circulation fans creates air movement that prevents stagnant humid zones around dense plant foliage.
Fixing Air Leaks
Drafts reduce insulation effectiveness by up to 25% and create temperature fluctuations that stress greenhouse plants. We locate air leaks by conducting smoke tests on windy days or using thermal imaging cameras during cold weather.
Inspecting all glazing connections reveals loose panels and deteriorated seals around windows and doors. Common leak points include foundation joints, ventilation louvers, and structural connections where different materials meet.
Sealing gaps with silicone caulk provides permanent weatherproofing for stationary components like foundation perimeters and fixed glazing systems. We apply clear silicone in continuous beads without breaks to maintain effective thermal barriers.
Weather stripping around movable components like doors and adjustable vents creates flexible seals that maintain effectiveness during operation. Foam tape strips work effectively for seasonal applications while rubber seals provide long-term answers.
Emergency repairs using scrap greenhouse plastic offer temporary fixes for sudden panel damage during storms. We secure plastic patches with greenhouse clips and seal edges with clear tape until permanent repairs can be completed.
Addressing Ventilation Concerns
Proper airflow prevents humidity buildup and maintains plant health while preserving insulation benefits during cold periods. We balance ventilation needs with heat retention by using automated vent systems triggered by temperature thresholds.
Installing roof vents at the peak allows hot air to escape naturally through convection currents. Ridge vents spanning the entire roof length provide consistent air exchange without creating cold drafts on plant surfaces.
Louver vents positioned near ground level supply fresh air intake to replace warm air exiting through roof openings. We calculate vent area requirements based on 15-20% of floor space for adequate air exchange rates.
Restricting ventilation during extreme cold protects plants from temperature shock while maintaining minimum air circulation. Manual override controls on automated systems allow precise ventilation management during variable weather conditions.
Circulation fans operating at low speeds maintain air movement without excessive heat loss through convection cooling. We position fans to create gentle air currents that prevent stagnant zones while avoiding direct airflow on sensitive plants.
Maintaining Your Insulated Greenhouse
 10")
Consistent maintenance protects your insulation investment and maximizes energy efficiency throughout the year. Regular care prevents costly heat loss and extends material lifespan significantly.
Regular Inspection Schedule
Weekly visual inspections catch obvious damage before it compromises thermal performance. Look for loose bubble wrap sections, detached polycarbonate panels, and gaps around door frames during each visit.
Monthly seal checks focus on vulnerable areas like doors and vents where weather stripping commonly fails. Examine all sealing materials for cracking, peeling, or compression that reduces effectiveness.
Seasonal thorough inspections occur before winter and after spring to assess overall insulation integrity. Check corners and edges where materials experience the most stress from temperature fluctuations and wind exposure.
Storm damage requires immediate attention since compromised insulation creates important heat loss points. Inspect all materials after extreme weather events, paying special attention to areas that faced prevailing winds.
Cleaning and Replacing Materials
Surface cleaning with mild soap and soft cloth removes dust buildup that blocks light transmission and reduces insulative properties. Clean all insulation materials monthly to maintain optimal performance levels.
Bubble wrap replacement happens immediately when tears or detachment occur since damaged sections eliminate thermal barriers. Replace entire panels rather than patching small sections to ensure uniform insulation coverage.
Pest inspection during cleaning identifies insects or disease organisms that harbor in dirty insulation materials. Remove any contaminated sections and sanitize surrounding areas with appropriate greenhouse cleaners.
Material aging varies by type, with bubble wrap lasting 2-3 years while polycarbonate panels maintain effectiveness for 10-15 years. Track installation dates and replace materials before performance degrades significantly.
Seasonal Adjustments
Winter preparation involves adding extra insulation layers and securing all seals against cold air infiltration. Install 2-inch polystyrene foam around foundation bases, extending at least 12 inches below ground level to prevent heat loss through soil contact.
Spring removal of temporary insulation prevents overheating during warm months and improves ventilation airflow. Remove excess bubble wrap layers and thermal screens while maintaining permanent foundation and structural insulation.
Summer ventilation requires partial insulation removal to promote air circulation and prevent temperature spikes above 85°F. Keep foundation insulation in place year-round while adjusting removable panels based on seasonal temperature patterns.
Gap inspection intensifies before winter since expanding and contracting materials create new openings. Seal foundation gaps and check greenhouse frame connections where thermal bridging commonly occurs during temperature changes.

Conclusion
We’ve covered everything you need to transform your greenhouse into an energy-efficient haven that protects your plants year-round. From bubble wrap and rigid foam boards to foundation insulation and thermal mass answers these proven techniques can reduce your heating costs by up to 50% while creating optimal growing conditions.
Remember that successful greenhouse insulation isn’t just about installation—it’s about maintenance and seasonal adjustments too. Regular inspections and timely repairs will keep your insulation performing at its best for years to come.
The investment you make in proper insulation today will pay dividends through lower energy bills healthier plants and extended growing seasons. Your greenhouse will become a reliable sanctuary where your plants can thrive regardless of what winter throws your way.
Frequently Asked Questions
What are the main benefits of insulating a greenhouse during winter?
Proper greenhouse insulation creates a stable growing environment while significantly reducing heating costs by up to 50%. It protects plants from temperature fluctuations, maintains optimal growing conditions year-round, and can cut energy expenses by 35%. Insulation also helps prevent plant stress and disease by maintaining consistent temperatures throughout the cold months.
What materials are most effective for greenhouse insulation?
Bubble wrap is the most cost-effective option and can reduce heat loss by up to 35%. Polycarbonate panels offer superior thermal performance and durability. Thermal screens can reduce heating costs by 30-40%. Rigid foam boards provide permanent insulation solutions, while weatherstripping materials help seal gaps and prevent heat loss.
When is the best time to install greenhouse insulation?
Install insulation from fall through spring to maximize energy efficiency during cold months. Begin preparation in early fall before temperatures drop significantly. Remove temporary insulation materials during peak growing periods in late spring and summer to enhance light transmission and improve ventilation for optimal plant growth.
How do I prepare my greenhouse for insulation installation?
Clean and inspect the entire greenhouse structure for damage, including glazing materials and foundation stability. Identify primary heat loss areas such as windows, doors, and ventilation systems. Test for air leaks using methods like candle flame detection. Measure all surfaces accurately and create a detailed materials list to streamline the installation process.
What tools do I need for greenhouse insulation installation?
Essential tools include measuring tape, utility knife, staple gun, drill with bits, and construction adhesive. Safety equipment is crucial: safety glasses, work gloves, dust masks, and knee pads. Additional supplies include greenhouse clips, double-sided tape, clear silicone caulk, and expanding foam sealant for proper sealing and installation.
How do I install bubble wrap insulation effectively?
Cut bubble wrap to fit glass panel dimensions with slight overlap for complete coverage. Attach using a light water mist on glass surfaces, then secure with greenhouse clips and double-sided tape. Seal all edges and corners with clear silicone caulk to prevent air gaps and ensure maximum insulation effectiveness.
Should I insulate my greenhouse foundation?
Yes, foundation insulation creates a thermal barrier that reduces ground heat loss by up to 40%. Excavate around the perimeter, install rigid foam boards underground, and seal all joints. Proper backfilling and waterproofing protect the insulation while ensuring adequate drainage. This significantly improves overall greenhouse thermal efficiency.
How do thermal mass solutions help with greenhouse heating?
Thermal mass materials like water barrels and stone features absorb heat during the day and release it gradually at night, stabilizing temperatures. Dark-colored water barrels are particularly effective for heat absorption. Strategic placement throughout the greenhouse maximizes heat storage and distribution without interfering with plant growth or ventilation.
What are common problems with insulated greenhouses?
Condensation is the primary concern, potentially leading to plant diseases and reduced insulation effectiveness. Air leaks can cause temperature fluctuations and energy loss. Poor ventilation creates stagnant air and humidity problems. Regular maintenance, proper ventilation installation, and systematic leak detection help prevent these issues and maintain optimal growing conditions.
How often should I maintain my greenhouse insulation?
Perform weekly visual damage checks, monthly seal inspections of vulnerable areas, and thorough seasonal inspections before winter and after spring. Clean insulation materials regularly to maintain performance and replace damaged components immediately. Make seasonal adjustments by adding extra layers in winter and removing temporary insulation in warmer months.