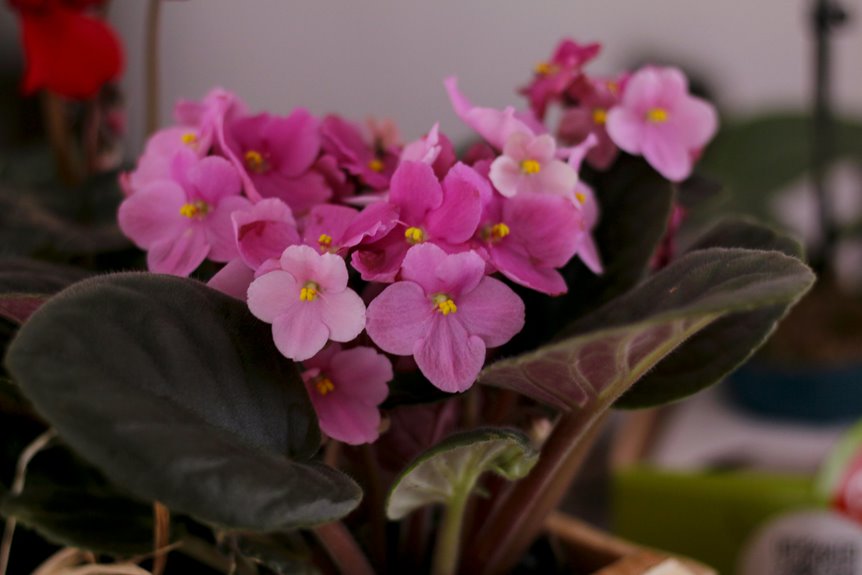
Light and Temperature
Place your African violet where it receives bright, indirect light for 12–14 hours each day. A north or east-facing window works well. Keep the room temperature between 65–80°F. Temperatures outside this range slow growth and can damage leaves.
Humidity
African violets need humidity around 40–60%. Instead of misting the leaves directly, which can cause spotting, set the pot on a pebble tray. Fill the tray with water just below the top of the pebbles so the pot sits above the water line. As the water evaporates, it raises humidity around the plant.
Watering
Water from the bottom every 1–2 weeks using room-temperature water. Bottom watering means placing the pot in a container of water and letting it absorb moisture through the drainage hole. This prevents water from sitting on the leaves. Check the soil before watering again—it should feel slightly moist but not soggy.
Soil and Repotting
Use shallow, well-draining soil formulated for African violets. Repot annually into a container only slightly larger than the current one. Shallow pots prevent water from pooling around the roots, which leads to rot.
Fertilizing
Feed your plant with diluted fertilizer once weekly during the growing season (spring and summer). Use half the strength recommended on the package. Skip fertilizing in fall and winter when growth naturally slows.
Air Circulation
Good air movement around the plant prevents fungal and bacterial diseases. Position your violet where air can flow around it without placing it in a direct draft from heating or cooling vents.
Where African Violets Grow in Nature

African violets come from the rainforests of East Africa, mainly Kenya and Tanzania. In these forests, they grow in shaded spots between rocks and under fallen leaves where the air stays humid. The forest canopy protects them from direct sunlight, which is how they naturally get indirect light.
Native African violets experience temperatures between 64–90°F with humidity around 77%. These conditions shape how the plants grow. They develop as low, spreading plants with leaves adapted to life under the forest canopy.
To grow African violets successfully at home, recreate these rainforest conditions. Place your plants where they receive indirect light and avoid direct sun. Keep the humidity high and maintain temperatures in that 64–90°F range. This approach gives your plants the protected environment they need to develop properly.
Selecting a Healthy African Violet to Bring Home

When you’re picking out an African violet, focus on what tells you the plant is in good condition. Look for leaves that feel firm to the touch and plenty of bright buds. These signs mean the plant is still in its prime and hasn’t started to decline.
Shop at local garden centers instead of big box stores. The staff there can answer questions about how to care for the plant and spot problems you might miss. They know their inventory well.
Check the overall appearance before you buy. The plant should look fresh and full of energy, not droopy or sparse. This matters because a healthy plant from the start will adjust much better when you repot it at home and begin your regular care routine.
Leaf and Bud Assessment
Leaf and Bud Assessment
Look at the leaves first to determine if an African violet will do well in your home. Check each leaf for firmness and bright color. Soft leaves, yellowing patches, or dark spots mean the plant has problems. Skip any plant with wilted or torn foliage.
Next, examine the buds. A healthy African violet will have many firm buds clustered in the center of the plant. This shows it’s ready to produce flowers. Avoid plants with sparse buds or ones that look brown and dried out.
Consider the plant’s overall shape and posture. A healthy African violet stands upright and looks balanced, not stretched out or drooping to one side. If anything seems wrong with the plant’s appearance, choose a different one. Making a careful choice at the store saves you trouble later.
Purchase Location Considerations
Shop at a local garden center for the best selection of healthy African violets. The staff there understands your area’s watering conditions and soil needs, so they can give you practical advice that actually applies to your home. This matters more than you might think.
If you go to a grocery store instead, look for the healthiest plant on the shelf. Check the leaves—they should feel firm and look green, not soft or yellow. The buds need to look full and ready to open. Skip any plant that’s drooping, has yellow leaves, or looks sparse and thin. A plant in poor condition will give you problems from day one.
When you get home, repot your violet right away. Move it from its plastic nursery pot into a container that’s slightly larger, using fresh potting soil that drains well. This gives your plant a clean start in a better growing environment.
Repotting After Purchase: The Critical First Step

The moment you bring your African Violet home from the store, repot it right away. The plastic nursery pot won’t serve your plant well long-term.
Start by getting African Violet-specific soil. This soil needs to be light, loose, and well-draining. Nursery mix compacts quickly and traps moisture around the roots, which leads to waterlogging.
Select a pot that matches about one-third of your plant’s leaf spread. If you jump to a pot much larger than the current one, you risk transplant shock. The plant won’t have enough root mass to use all that extra soil, and water will sit around the roots longer than it should.
Remove your African Violet from its nursery pot carefully. Loosen the old soil around the roots with your fingers. Place fresh African Violet soil in the bottom of your new pot, then position the plant so the top of its root ball sits just below the rim. Fill in around the sides with more fresh soil, pressing gently but firmly to remove air pockets.
Water the plant lightly after repotting. This settles the soil and helps roots make contact with their new medium. The fresh soil gives your plant proper aeration and drainage from day one, which sets up a solid foundation for healthy growth.
Choosing the Right Soil Mix for Long-Term Health

Use a soil mix that’s light and airy to keep your African violet healthy. Look for blends made specifically for African violets, such as Black Gold or Espoma. These mixes have the right texture to prevent soil from getting packed down over time.
If you can’t find a dedicated blend, make your own by mixing equal parts peat moss, vermiculite, and perlite. This combination gives you the loose, well-draining texture your plant needs.
Repot your African violet once a year into a shallow terra-cotta pot that’s about the same size as its current one. Use fresh soil when you repot. This keeps the soil from becoming compacted and gives your plant the conditions it needs to stay healthy.
Soil Composition And Ingredients
African violets need different soil than most houseplants because of their shallow root systems and small pots. Standard potting soil gets compacted and holds too much water, which causes problems for these plants. You need a light, airy mix that lets water drain quickly.
What to Mix In
Start with these three main ingredients in equal parts:
- Peat moss – holds moisture without adding weight
- Perlite – creates air pockets so soil doesn’t pack down
- Vermiculite – improves aeration and drainage
You can also add dolomite lime and horticultural charcoal if you want to fine-tune the balance. These aren’t required, but they help create a more stable growing environment.
Making Your Own vs. Buying
Mixing your own gives you complete control over what goes in the pot. Combine one part peat moss, one part vermiculite, and one part perlite. This ratio works reliably for African violets.
If you buy a pre-made African violet soil mix, check whether it contains added fertilizer. If it does, you’ll need to feed your plant less often. Too much fertilizer can burn the roots, so adjust your feeding schedule based on what the package says.
Repotting And Maintenance Schedules
Once you’ve sorted your soil mix, you need to know the right timing and method for repotting African violets. Plan to repot every year to refresh the soil and replace depleted nutrients. When you first bring a plant home, repot it right away from its plastic nursery container into fresh soil.
Pick a pot that matches your current one in size—the depth should equal the width so water doesn’t pool at the bottom. Terra-cotta pots and self-watering violet pots are your best options because they naturally support good drainage. When you fill the pot, keep the soil light and fluffy. Don’t press it down or pack it tight, as compacted soil leads to poor root health and weak growth.
This yearly refresh prevents roots from becoming stressed and keeps your plant from developing the leggy, struggling appearance that comes with exhausted or compacted soil.
Fertilizing Your African Violets Without Over-Feeding

African violets don’t need heavy feeding to do well. Too much fertilizer actually damages them more than it helps. The right approach keeps your plants blooming without causing problems.
Use the Weekly Weakly Method****
Apply diluted, light fertilizer once a week while your plants are actively growing and flowering. This light touch prevents nutrient buildup in the soil that can burn roots.
Weekly diluted fertilizer applications keep African violets blooming while preventing harmful nutrient buildup that burns roots.
Pick the Right Formula
Choose a balanced fertilizer or one higher in phosphorus to support blooms rather than just leaf growth. High-nitrogen fertilizers push foliage development instead of flowers, so avoid those when blooms are your goal.
Account for Your Potting Soil
If you’re using Miracle-Gro African Violet Potting Soil, reduce how often you fertilize. This soil already contains built-in nutrients, so additional feeding can lead to over-fertilization.
Skip Fertilizing During Recovery
Don’t fertilize your plants right after repotting or treating them for pests. Fertilizer can damage roots that are already stressed, causing root burn. Wait until the plant shows new growth before resuming your regular feeding schedule.
Follow Dilution Directions****
Read the package instructions carefully for how much to dilute your fertilizer. Using the correct ratio matters more than guessing at concentrations. Stick to the measurements listed to keep feeding light and steady throughout the growing season.
Mastering Bottom Watering: The Preferred Method

Why does bottom watering work so well for African violets? You’re avoiding wet foliage, which prevents leaf rot and fungal issues. Place your nursery pot in a saucer of room-temperature water for up to 30 minutes, then drain the excess water carefully.
This method lets the soil absorb moisture from below while you control how wet it gets. Use light, well-draining soil so water penetrates evenly without compacting. After soaking, the substrate should feel moist to the touch—not waterlogged.
Check your pot’s weight to know when watering is needed again. Most African violets need bottom watering every one to two weeks, depending on your room temperature and humidity. Room-temperature tap water works fine unless it’s softened or high in chlorine. Aim for a pH between 6.5 and 7.5 to help your plant take in nutrients properly. Never let your plant sit in standing water, as this causes root rot.
Top Watering and Wick Watering: Alternative Techniques

Top Watering
Top watering works well when you prefer a more convenient approach. Pour room-temperature water directly into the top of the pot until it flows out the drainage holes into a saucer below. After 10–30 minutes, empty the saucer to stop water from sitting around the base of the plant, which can cause crown rot.
Water can splash onto leaves during this process. Pat the foliage dry or rinse it gently afterward to prevent leaf spotting and stem damage.
For better results, try double-watering. Water the pot once, wait a few minutes for the soil to absorb it, then water again. This second watering helps leach out mineral salts that build up in the soil over time.
Wick Watering
Wick watering is a passive method that requires almost no daily attention. You’ll need thin fabric strips or braided rope that sit in the soil and extend down into a water reservoir below the pot. The wick pulls water up through the soil by capillary action, keeping moisture levels steady without you having to water regularly.
Set up a wick by placing one end in the pot’s soil and running the other end into a container of water positioned lower than the pot. As the soil dries slightly, the wick draws water up to replace it.
The downside is that wicks wear out over time and need replacing. Check your wick every few months and swap it out if it becomes frayed or stops pulling water effectively.
Choosing Your Method
Both top watering and wick watering work when bottom watering doesn’t fit your schedule. Pick whichever method matches your daily routine and comfort level.
How Often to Water Based on Pot Weight and Soil Moisture

Lift your African violet’s pot regularly to check its weight. A light pot means the soil has dried out and needs water. A heavy pot means there’s still moisture in the soil.
This weight-check method lets you gauge soil moisture without poking at the soil constantly, which can damage the roots. By monitoring the pot’s weight, you water based on what your plant actually needs rather than following a fixed schedule. This keeps your violet’s soil in that slightly moist state it prefers.
Lifting Pot Weight Assessment
Lifting Pot Weight Assessment
One of the simplest ways to know when your African violet needs water is to lift the pot and feel its weight. This method works because soil gets noticeably lighter as it dries out. You develop a feel for your plant’s watering needs without guessing.
Pay attention to these signals:
- Light pot — the soil has dried enough and needs water
- Heavy pot — water still fills the soil, so wait to avoid root rot
- Check every few days — lift the pot regularly to learn your plant’s specific rhythm
- Account for seasonal changes — temperature and humidity shifts throughout the year affect how fast soil dries
Monitoring Soil Moisture Levels
How often should you water your African violet? The answer depends on your plant’s soil moisture level, not a fixed schedule. Lift your pot regularly to feel its weight. Right after watering, it will be heavy. As the soil dries out, the pot becomes noticeably lighter. When you notice that difference, it’s time to water again. This method prevents you from overwatering, which leads to root rot.
Bottom watering works best for African violets. Fill an outer container with room temperature water between 68–76°F. Place your nursery pot inside so the water reaches halfway up the sides. Leave it there until the soil’s top surface feels wet, then remove the pot and drain it completely. The soil should feel lightly moist, never soggy or waterlogged.
Most African violets need water every 1–2 weeks using this method, but the exact timing depends on your home’s temperature, humidity, and light conditions. By regularly lifting your pot and checking its weight, you’ll develop a feel for when your violet actually needs water rather than watering on a fixed schedule.
Recognizing and Preventing Overwatering and Root Rot

Because African Violets prefer consistently moist (not wet) soil, overwatering is the quickest way to damage or kill your plant. Root rot develops when your violet sits in standing water, creating conditions for harmful fungi like Pythium and Phytophthora to grow.
Overwatering African Violets causes root rot and fungal growth. Keep soil consistently moist, never wet, to prevent permanent damage.
Watering Practices
Never allow water to collect in saucers underneath your pot. After you water, drain the saucer completely. Check soil moisture by feeling the top layer with your finger—water only when it feels dry to the touch. Use room-temperature water instead of cold water, which can shock your plant’s roots.
Monitor pot weight regularly to get a sense of how heavy it feels when wet versus dry. This helps you gauge moisture levels without constantly digging into the soil.
Spotting Problems Early
Watch for crown and stem rot as the first signs that overwatering has started. You’ll also notice wet foliage developing botrytis or mildew, which appear as gray or white fuzzy patches on leaves. These warning signs mean you need to change your watering habits immediately. Catching these issues early gives you the best chance of saving your plant before the damage becomes permanent.
Light Requirements for Blooming and Plant Health
Why do some African violets bloom prolifically while others stay stubbornly flowerless? The answer lies in light. African violets need bright light for 12–14 hours daily to bloom well.
Position your plant near an east or north-facing window, or place it within 24 inches of any window using filtered light to prevent leaf burn. If your space lacks natural light, grow lights work well. LED or fluorescent grow lights deliver consistent, indirect illumination year-round and compensate for insufficient sunlight.
Watch your plant for signals about its light situation. Leggy, long stems mean your African violet isn’t getting enough light. Bleached leaves indicate too much intensity. Adjust the light accordingly based on what you see.
Why African Violet Leaves Develop Brown Spots and Disease
Brown spots on African Violet leaves usually come from moisture sitting on the foliage. When water lands on the leaves during misting or overhead watering, it creates a wet environment where fungal diseases like botrytis and mildew grow quickly.
Change your watering method to prevent this problem. Water at the soil level instead of from above. You can use a wick system that pulls water up from a reservoir, or pour water carefully at the base of the plant. If water accidentally splashes onto the leaves, dry them right away with a soft cloth.
Beyond adjusting how you water, two other factors help stop fungal growth. First, allow air to move freely around your plant. Position it where there’s gentle air circulation, and avoid crowding it with other plants. Second, keep humidity at moderate levels. African Violets like some moisture in the air, but excessively humid conditions make fungal problems worse. A humidity level between 40 and 60 percent works well.
Following these three steps together—watering from below, maintaining air circulation, and managing humidity—will stop most fungal issues before they start.
Moisture And Fungal Issues
One of the most common problems African violet owners face is brown spots and leaf disease. The root cause almost always comes down to watering method and moisture control. When water sits on leaves or collects around the crown, it creates conditions where fungi like Pythium and Phytophthora thrive and cause rot.
Water from the bottom or use a wick system** instead of misting or overhead watering**. This keeps the foliage completely dry, which stops most fungal problems before they start.
Dry any wet leaves immediately if water does splash on them. Use a soft brush to clean leaf surfaces rather than water, since water promotes botrytis and mildew growth.
Maintain humidity between 40 and 60 percent while running a fan or opening a window to keep air moving around the plant. Stagnant air holds moisture and helps fungi spread.
The crown of the plant deserves special attention since rot develops quickly there. Keep that area completely dry by checking after watering and wiping away any moisture you find.
Your watering method directly determines whether your African violet stays healthy or gets sick. Focus on keeping the crown and leaves dry, and you’ll prevent most problems from developing.
Misting Causes Leaf Damage
While keeping moisture levels controlled around the crown and roots is important, what you do with the leaves themselves matters just as much. Misting your African violet directly causes serious problems. When water sits on the foliage, it creates the right conditions for fungal diseases like botrytis, mildew, and crown rot. This moisture lingers on the leaf surface and leads to brown spots and foliar damage.
Instead, water the soil directly at the base of the plant. You can also use careful top-watering that keeps water off the leaves entirely. Pour slowly and close to the soil line to avoid splashing water onto the foliage.
If your plant’s leaves need cleaning, use a soft brush to gently remove dust. When you must moisten the foliage for any reason, apply water indirectly and make sure it dries quickly afterward. Keep your African violets’ leaves completely dry as a general rule, and you’ll avoid the leaf problems that come from excess moisture.
Maintaining Humidity Without Misting the Foliage

How can you give your African violet the moisture it craves without damaging its delicate leaves? Keep foliage completely dry while maintaining humidity around 40%–60% using these indirect methods:
Pebble trays work by filling a shallow tray with pebbles and adding water until it sits just below the soil line. Set your pot on top of the pebbles. As the water evaporates, humidity rises naturally around the plant without wetting the leaves.
Humidifiers provide consistent moisture throughout the room. An electric humidifier placed nearby lets you control humidity levels without hands-on effort. This method works well if you have multiple plants in one area.
Water bowls offer a simple approach. Position open containers of water close to your plant and let evaporation do the work. This takes longer than a humidifier but requires no electricity.
Self-watering systems use capillary action to deliver water directly to soil while keeping the crown and roots at proper moisture levels. These setups prevent water from splashing onto leaves.
Monitor your humidity with a hygrometer so you know when to adjust your method. Check the reading regularly and switch between techniques or combine them if needed. Staying within the 40%–60% range protects your plant while giving it the moist environment it needs to bloom.
Temperature Range and Cold Stress Avoidance

Keep your African violets between 65–80°F (18–27°C) for the best growth and blooming. Temperatures below 60°F or above 80°F will trigger cold stress and poor flowering. You need to avoid these extremes consistently.
Position your violets away from chilly windows and cold drafts, especially during winter months. Keep them about 18 inches from windows to reduce temperature swings that stress your plants. Sudden shifts between day and night temperatures harm your plants, so maintain steady conditions instead.
Don’t place violets near cold glass surfaces or heating vents that create temperature changes. If you use grow lights to supplement natural light, select ones that don’t produce excess heat. This approach protects your African violets from temperature-related damage while supporting healthy blooms.
Selecting Pot Size and Material for Healthy Growth

Pot Size and Material Selection
Terra-cotta is your best choice for African violets because the material lets air and moisture pass through the sides and bottom. This prevents water from sitting around the roots, which can cause rot.
For sizing, measure your plant’s leaf spread from one side to the other. Your pot should be roughly one-third that width. A plant with a 9-inch leaf spread, for example, needs a pot around 3 inches across. This keeps the roots slightly potbound, which African violets prefer.
Pick a pot with a depth equal to its width. A 3-inch-wide pot should be 3 inches deep. Shallow containers stop water from pooling at the bottom and creating soggy soil conditions that damage roots.
Soil Preparation
Use a potting mix made specifically for African violets, or mix your own. Combine equal parts peat moss, vermiculite, and perlite. This blend holds moisture while staying light and airy around the roots.
Self-watering pots can work if you monitor them closely. The problem is that roots may sit in standing water between watering cycles. If you use one, check the water level regularly and empty excess water when needed.
When to Repot
Refresh your soil once a year to prevent root compaction. When roots start showing at the soil surface or wrapping around the inside of the pot, move your plant to the next size up. If your plant looks leggy or weak despite good light and care, rootbound conditions may be the cause.
Growing New Plants From Leaf Cuttings

Once your African violets are doing well in the right pot and soil, you can grow new plants from a single leaf. Pick a healthy leaf and place the petiole—that’s the thin stem connecting the leaf to the plant—just below the soil surface. Use a sterile, airy medium like peat-based soil or African Violet mix.
Keep the humidity high by covering your pot with a clear plastic dome or bag. This reduces water loss without making the soil soggy. Don’t mist the leaves directly, as wet leaves can develop problems.
Place your leaf cuttings in bright, indirect light at around 21°C (70°F). This temperature helps roots develop at a steady pace. Roots should start forming within a few weeks.
Once you see both roots and new leaf growth, move the young plant to a shallow pot with good drainage. A shallow pot prevents roots from sitting in wet soil and gives your new violet room to establish itself properly.


