Keep your croton in bright indirect light for 6–8 hours daily. This maintains the vivid colors in the leaves. Direct sunlight can scorch the foliage, while too little light causes the colors to fade and leaves to drop.
Water when the top inch of soil feels dry to the touch. Use lukewarm water and make sure the pot has drainage holes so excess water can escape. Crotons don’t like sitting in wet soil, which leads to root rot.
Maintain indoor temperatures between 60–85°F. These plants struggle when it gets colder than 60°F. Boost humidity by misting the leaves a few times per week or placing the pot on a pebble tray filled with water. The pebbles keep the pot above the water line while moisture rises around the plant.
Feed your croton every 2–4 weeks during the growing season (spring and summer) with a balanced fertilizer that contains micronutrients like iron and magnesium. Skip feeding during fall and winter when growth slows down.
Rotate your plant a quarter turn once a week. This prevents it from leaning toward the light source and promotes even growth. Check the leaves weekly for spider mites, mealybugs, and scale insects. Spray affected areas with insecticidal soap if you spot pests, following the product instructions carefully.
These steps work together to prevent common problems like leaf drop and color loss. Stick to the routine and your croton will stay healthy.
What Is a Croton Plant and Why Grow One?
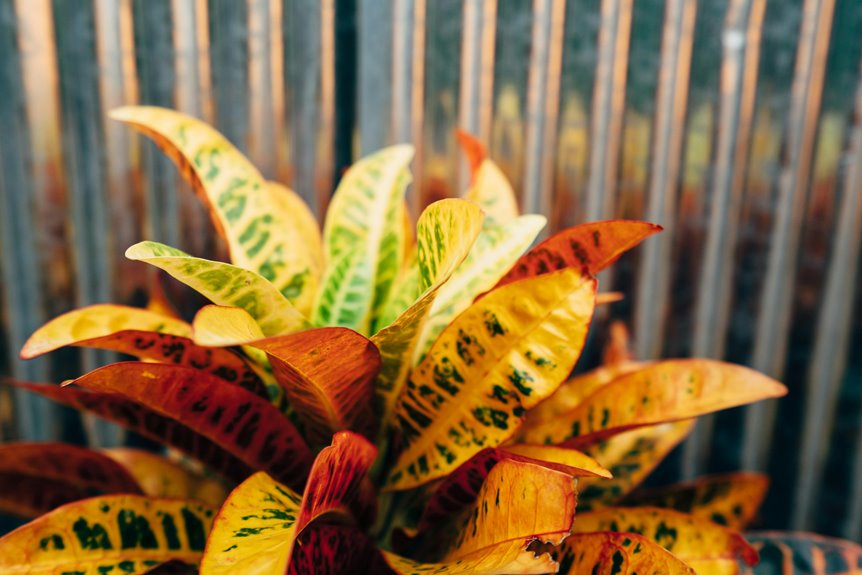
Why would you want a houseplant that demands attention and care? If you’re looking for a tropical houseplant with real visual impact, the croton plant—scientifically known as Codiaeum variegatum—delivers bold color to any room. Native to tropical regions, crotons have thick, leathery leaves in vibrant reds, oranges, yellows, and purples.
Growing a croton requires commitment. You need to provide bright indirect light to keep those colors vivid, maintain warm humidity levels, and give the plant consistent care. The payoff is foliage that works as a focal point in your home. Yes, these plants are demanding. That’s exactly why serious plant collectors choose them—the results justify the work involved.
Croton Lighting: How Bright Is Bright Enough?

Your croton needs bright indirect light for 6–8 hours each day to keep its leaf colors rich and full. The key is finding the right balance: strong light that doesn’t hit the plant directly during midday hours. Position your croton near a window where sunlight filters in without creating harsh rays that burn the leaves.
More light deepens your croton’s colors and keeps the foliage looking full. Without enough light, leaves become pale and dull, and the plant grows tall and spindly as it reaches for better conditions. If your space is dim, increase the light exposure gradually over a week or two. This slow adjustment prevents shocking the plant.
Rotate your croton every few weeks so all sides receive equal light. This encourages even growth instead of the plant leaning toward the brightest spot. Check your plant weekly—if new leaves come in pale or the stems stretch between leaves, your croton is telling you it needs more light. Adjust its position accordingly and observe the results over the next two to three weeks.
Watering Your Croton: Frequency and Soil Prep

Once your croton gets the light it needs, watering becomes your next priority. Getting this right keeps your plant healthy.
Before watering, feel the top inch of soil with your finger. When it feels dry, water thoroughly with lukewarm water. This prevents shocking your plant with cold water. Your goal is to keep the soil consistently moist but not waterlogged, since standing water causes root rot.
Before watering, check if the top inch of soil is dry. Use lukewarm water to avoid shocking your croton and prevent root rot.
Seasonal Watering Schedule
Water more frequently during spring and summer when your croton actively grows. As temperatures drop in fall and winter, reduce how often you water since growth slows. Always check the soil first, regardless of the season. This approach prevents both underwatering and overwatering.
Soil Mix and Drainage
Use a well-draining potting mix made from peat moss, pine bark, and perlite. This combination lets water move through the soil without pooling around the roots. After watering, empty any standing water from the saucer or drainage tray immediately. Water sitting under the pot invites root rot and fungal problems.
Adjust your watering based on what you see in the soil. More frequent watering during growth periods and less during dormant months keeps your croton healthy and prevents common problems.
Croton Temperature and Humidity Needs

Temperature stability matters as much as light and water when growing a croton. Keep temperatures between 60°F and 85°F. Move your plant away from cold drafts and chilly windows. Sudden temperature changes cause leaf drop, so aim for consistency. If you have container-grown crotons outdoors, bring them inside before cold snaps arrive.
Humidity management is equally important. Crotons thrive in moderate to high humidity. You have several options to increase moisture in the air: mist the leaves regularly with a spray bottle, use a humidifier set to 50-60% humidity, or place a pebble tray underneath the pot. For the pebble tray method, fill a shallow tray with pebbles, add water until it just reaches the top of the pebbles, and set your pot on top. The water evaporates and creates humidity around the plant without waterlogging the roots.
Combined with stable temperatures, proper humidity supports healthy foliage and maintains the plant’s color.
Fertilizing Your Croton During the Growing Season

Why does your croton’s color seem to fade even when you’re giving it plenty of light? The answer often lies in fertilizing. During the growing season, feed your croton every two to four weeks with a balanced fertilizer formulated for houseplants. This prevents nutrient burn while delivering consistent nutrition.
Choose a fertilizer containing micronutrients like iron and manganese. These elements enhance color vibrancy in a way that high nitrogen alone cannot. Nitrogen promotes leafy growth, but it won’t give you the deep colors you want from your croton.
Water your plant before and after feeding. This helps the fertilizer disperse throughout the soil and reach the roots effectively.
Watch for warning signs of over-fertilization. Brown leaf tips or crusty salt deposits on the soil surface mean you’ve been feeding too much. If you see these signs, flush your potting mix with water immediately to remove excess salts.
Adjust your feeding schedule with the seasons. Feed regularly during spring and summer when your croton is actively growing. Reduce feeding in fall and winter when growth slows down.
Pruning Crotons for Shape and Fullness

How do you keep your croton looking full and vibrant instead of tall and leggy? Regular pruning changes your plant’s appearance and encourages bushier growth.
Remove Dead or Unhealthy Growth
Start by trimming away any dead or unhealthy leaves and branches. Cut just above a node or leaf set, which is where leaves attach to the stem. This is where new growth will emerge.
Cut the Right Amount
Never remove more than one-third of the stem height in a single pruning session. Cutting too much at once shocks the plant and slows its recovery. Light, regular trims work better than heavy cuts. Space your pruning sessions a few weeks apart for steady results.
Use Proper Tools
Use sharp, clean pruning shears for every cut. Dull blades tear the stem tissue and create openings for disease. Wipe your shears with rubbing alcohol between cuts if you’re removing diseased material.
Support New Growth
After pruning, place your croton in bright light. Bright indirect light from an east or west-facing window works well. Keep the soil consistently moist but not waterlogged, and maintain humidity around 50-60% by misting the leaves weekly or placing the pot on a pebble tray filled with water. New growth will fill in within 3 to 4 weeks.
When and How to Repot

Your croton will eventually outgrow its pot, which means you’re providing good care. Plan repotting for spring or summer when the plant actively grows and recovers more easily from the process.
Select a pot only one size larger than the current one. This matters because oversized pots hold excess soil that stays too wet. Fill the new pot with well-draining soil made from peat moss, pine bark, and perlite mixed together. This combination gives you the slightly acidic to neutral pH your croton needs.
Before placing the plant in its new home, gently loosen the roots with your fingers. Look for any dead roots—they’ll appear brown or mushy—and trim them with clean scissors. Also remove any roots that circle the root ball, as these won’t spread into the new soil properly.
Water the plant thoroughly right after repotting. This settles the soil around the roots and reduces transplant shock. Set it in bright, indirect light while it recovers. Increase humidity around the plant during this period by misting the leaves or placing a humidifier nearby.
Repot your croton every one to two years or whenever roots start crowding the container and poking out the drainage holes. Regular repotting prevents the plant from becoming root-bound and keeps it healthy.
Grow New Crotons From Cuttings

Select healthy stem cuttings that are 3–4 inches long with 3–5 leaves on each one. Make your cut just above a leaf node at a 45-degree angle. This angle increases the surface area for rooting.
Dip the cut end of each cutting in rooting hormone powder. This step helps speed up root development. Plant the treated cuttings in a well-draining, moisture-retentive soil mix. Push them into the soil deep enough that the bottom leaves sit just above the soil surface.
Place your planted cuttings in a warm location between 70–80°F. They need bright, indirect light and high humidity to develop roots successfully. You can create humidity by covering the pot with a clear plastic bag or placing the cuttings on a humidity tray with pebbles and water.
Check the soil regularly to keep it moist but not waterlogged. Roots typically develop within about a month. Once you see new growth appearing and the cuttings resist gentle tugging, they have rooted successfully. At this point, gradually reduce humidity and acclimate the young plants to lower moisture levels over a week or two before moving them to standard care conditions.
Cutting Selection And Preparation
When you’re ready to propagate your croton, selecting the right stem cuttings matters. Not all stems work equally well, so be intentional about your choices.
Look for stems that are 3 to 4 inches long with 3 to 5 healthy leaves. Cut at a 45-degree angle just above a leaf node. This angle increases the surface area available for roots to develop. Use sharp, clean tools to make clean cuts. Dirty or dull tools crush the stem tissue and invite disease.
Remove the lower leaves from your cutting, keeping only the top leaves. These lower leaves would sit in your growing medium and rot, which wastes energy and creates problems.
Dip the cut end of your prepared cutting into rooting hormone powder. This step speeds up root development by weeks. Place the cutting into a well-draining growing mix, then keep it in a warm location between 70 and 80 degrees Fahrenheit. The right temperature supports root formation without stressing the cutting.
Rooting And Growth Timeline
Croton cuttings typically need about one month to develop a functional root system. During this time, keep the temperature between 70–80°F. This warmth supports the rooting process.
Water your cuttings so the soil stays moist but not soggy. Too much water causes rot, while too little slows root development. Find the balance by checking the soil every few days and watering when the top feels dry to the touch.
Place your cuttings in bright, indirect light. Direct sunlight can stress young cuttings, but low light slows rooting. A spot near a window with a sheer curtain works well.
Humidity speeds up root establishment. Mist your cuttings every other day or place them in a humidity dome or plastic bag. You don’t need fancy equipment—a clear plastic bag propped open slightly does the job.
Once roots form, new leaves will start appearing. As your cutting grows, the leaves will develop the deep reds, oranges, and yellows that crotons are known for. This color development happens gradually over several weeks as the plant matures and gets stronger.
Croton Pests and Disease Control

Like most houseplants, crotons can fall victim to common indoor pests—mealybugs, scale, thrips, and spider mites are the usual culprits. Early detection prevents major damage, so staying vigilant matters.
Inspect regularly – Check leaves weekly for sticky residues, webbing, or stippling that signal pest activity. These signs tell you a problem is developing before it gets out of hand.
Wipe foliage – Clean leaves with a soft cloth to remove dust and reduce pest habitat. This simple step cuts down the places where pests can settle and multiply.
Treat promptly – Use rubbing alcohol on a cotton ball for mealybugs. For scale, apply horticultural oil according to the product label. Treating infestations early stops them from spreading through your plant.
Isolate if needed – Move infested plants away from others to prevent spread. Keep the plant separate until you’ve eliminated the pest completely.
Avoid broad-spectrum sprays, which stress your croton unnecessarily. If you spot severe infestation or root rot, repot your plant in fresh soil. This gives your croton a clean start and removes pests that may be hiding in the old soil.
Why Your Croton Is Dropping Leaves and Losing Color

If you’re noticing bare branches where vibrant leaves once were, your croton is signaling that something needs attention. Several factors trigger leaf drop, and identifying them helps you address the problem.
Light Requirements
Insufficient light causes your croton to shed leaves while it conserves energy. Move your plant to a spot with bright, indirect light. A north-facing window with filtered sunlight or a few feet back from a south-facing window works well. This supports growth and keeps colors vibrant.
Insufficient light causes leaf drop. Move your croton to bright, indirect light to support growth and keep colors vibrant.
Watering Schedule
Inconsistent watering stresses the roots and leads to leaf loss. Let the top inch of soil dry out between waterings. Stick your finger into the soil to check. When it feels dry at that depth, water thoroughly until it drains from the bottom. This prevents both overwatering and underwatering.
Temperature Control
Temperature swings and cold drafts trigger leaf drop. Keep your croton in a spot where temperatures stay between 60 and 85°F. Avoid placing it near heating vents, air conditioning units, or windows with cold drafts during winter.
Environmental Adjustments
Moving your plant between indoor and outdoor locations causes temporary leaf drop as it adjusts. If you must relocate your croton, do it gradually. Place it in a transition spot for a few days before moving it to its final location.
Pest Management
Spider mites, mealybugs, and aphids stress your croton and cause leaf loss. Check both sides of the leaves and stems weekly. If you spot insects or sticky residue, spray the affected areas with neem oil or insecticidal soap. Repeat treatment every 7 to 10 days until the infestation clears.
Winter Care and Seasonal Adjustments

When winter arrives, move your croton indoors to a bright location. Cold temperatures below 60°F and drafts will damage or kill this tropical plant. Keep it away from cold windows and heating vents.
Your croton needs consistent warmth between 60–85°F during winter months. Winter sunlight is weaker, so place the plant where it gets the most natural light available. Without adequate light, the leaves will fade in color and the stems will grow thin and weak.
If your croton starts dropping leaves or losing its color intensity, check two things first: the temperature around the plant and whether cold air from windows or vents is reaching it. Both problems can be fixed by moving the plant to a warmer spot away from drafts.
Protecting From Frost Exposure
How vulnerable is your croton to winter’s chill? These tropical plants struggle in cold temperatures, so you need a solid frost protection strategy. Here’s what to do:
Move potted crotons indoors when frost threatens. Place them in a warm room with bright, substantial light. This is your most effective option for container plants.
Cover outdoor crotons in mild southern regions. Use frost cloth or burlap to wrap the plant, securing it loosely around the base. This reduces—but doesn’t eliminate—frost damage risk. In areas with hard freezes, this method alone won’t save your plant.
Maintain proper indoor conditions. Keep your croton in warm temperatures between 60 and 75 degrees Fahrenheit. Provide bright, indirect light near a window. Boost humidity by misting the leaves every few days or running a humidifier nearby. Tropical plants lose moisture in heated indoor air, so regular misting helps prevent stress.
Avoid repeated cold exposure. Multiple frost shocks slow growth and weaken your plant’s ability to recover. Even if your croton survives one cold night, a second exposure causes cumulative damage.
Recovery after intense frost is possible if the plant still has living stems and leaves, but prevention is far simpler than dealing with damage afterward. Protect your croton from temperature extremes before they happen.
Indoor Winter Light Management
Your croton’s leaf color depends on winter light. Don’t skip this seasonal adjustment. Place your plant in a bright, sunny indoor location to get maximum light during those short winter days. Deep shade will dull the leaf color and weaken your plant overall.
Position your croton near south-facing windows when you can. This gives you the best bright indoor light. Combine this with a temperature range of 60-85°F to support healthy growth.
Winter air is dry, and that fades leaf color. Mist your plant regularly or use a humidifier to add moisture to the air around it. The combination of bright light, steady warmth, and humidity keeps your croton healthy through the winter months and protects it from cold damage.
Temperature Stability And Drafts
What’s one of the quickest ways to stress a croton? Exposing it to cold temperatures and drafts. Your croton needs warmth to stay healthy, so keep indoor temperatures between 60–85°F (15–29°C).
Positioning and Air Flow
Keep your plant away from windows and doors where cold air enters, especially during winter. Position it in a warm, bright spot that avoids drafts from heating vents or air conditioning units. These temperature swings will cause leaves to drop and weaken the plant.
Temperature Monitoring
Watch your indoor temperature closely. If it drops below 55°F (13°C), move your croton to a warmer location right away. Consistent warmth paired with bright indirect light supports steady growth and prevents stress-related leaf loss.
Outdoor Protection
If you keep crotons outside in mild climates, provide frost protection when freezing conditions approach. Bring plants indoors when temperatures threaten to drop below 55°F. This keeps your croton stable and healthy year-round.


