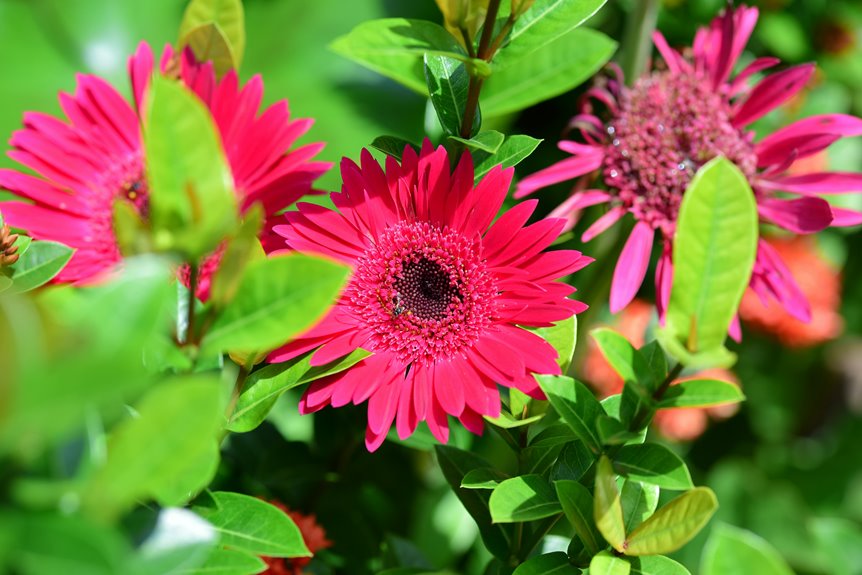
How Do You Take Care of Gerbera Daisy Plants
Light and Location
Place your gerbera daisies where they get bright light for most of the day. Morning sun is best, with afternoon shade to protect them from the hottest part of the day. If you’re growing them indoors, put them near a south-facing window. Without enough light, the plants won’t produce as many flowers.
Soil and Planting
Use well-draining soil mixed with organic matter like compost or aged bark. Gerberas don’t tolerate wet feet. If you’re planting in the ground, amend heavy clay soil with 2-3 inches of organic material worked into the top 8-10 inches. For containers, use a potting mix formulated for flowers or vegetables, not general-purpose soil.
Watering
Water at the base of the plant each morning rather than from overhead. Aim to keep the soil slightly moist but not soggy. Let the top inch of soil dry out between waterings. Check the soil by pushing your finger into it. If it sticks to your finger, wait another day before watering. Root rot happens quickly when soil stays wet, so this is where most gerbera problems start.
Feeding
Apply a balanced fertilizer, like a 10-10-10 formula, every two weeks during the growing season from spring through early fall. Follow the package directions for the amount based on your plant size. Stop feeding in late fall and winter when growth slows. Overfeeding causes weak stems and fewer flowers.
Deadheading
Remove spent flowers as soon as they start to fade. Pinch or cut the flower stem at the base where it connects to the plant. This tells the plant to keep producing new blooms instead of making seeds. Check your plants two to three times a week during peak blooming season.
Climate Considerations
In Zones 8-10, bring potted gerberas indoors before frost arrives in fall and keep them in a cool room with moderate light through winter. Move them back outside in spring after the last frost date. In cooler zones, treat gerberas as annuals and replace them each year, or grow them only as houseplants.
Division and Propagation
Divide mature plants in early spring when new growth appears. Carefully dig up the plant and separate the root clumps by hand or with a clean knife. Each division should have several stems and healthy roots. Replant divisions at the same depth they were growing before.
Pest Management
Watch for spider mites, aphids, and whiteflies, which prefer warm, dry conditions. Check the undersides of leaves regularly. If you spot pests, spray with neem oil or insecticidal soap, following label directions. Powdery mildew can develop in humid conditions, so provide good air circulation and avoid overhead watering.
Gerbera Zones and Seasonal Timing
Where you live determines how you’ll grow gerbera daisies. In USDA Zones 8–10, treat them as tender perennials. With proper mulch and winter protection, they’ll survive outdoors. In cooler zones, grow them as annuals instead.
Plant gerbera daisies in spring after frost danger passes. Space them 12–18 inches apart. They need full sun and afternoon shade to bloom well from late spring through autumn.
Most gardeners in Zone 8 and above bring their gerbera daisies indoors for winter rather than risk losing them outside. Keep the plants barely moist while they’re in cool conditions. This method lets you keep the same plants for the next growing season instead of starting over with new ones.
Soil and Drainage for Healthy Gerberas

Once you’ve planted your gerbera daisies in a sunny location, focus on getting your soil and watering right. Even the best sun won’t help if water pools around the roots and causes rot.
Your soil needs to drain well and contain organic matter. This combination lets water move through while keeping some moisture available for the plant. If your garden has poor drainage, grow gerberas in containers or raised beds instead of the ground.
Add 2–3 inches of organic mulch around each plant. Mulch keeps the soil temperature steady and reduces water loss without blocking air from reaching the roots.
Water deeply each morning so the foliage dries quickly and prevents leaf diseases. Water at the base of the plant rather than overhead, since splashing soil onto leaves encourages fungal problems.
Keep your soil slightly dry between waterings. The crown of the plant should stay barely moist, not soggy. This balance protects against both drought stress and root rot, which happens when soil stays too wet.
Light and Temperature for Gerbera Success

Gerberas need bright light to produce healthy blooms. Position your plants in a spot that gets morning sun with afternoon shade. This combination prevents leaf scorch while keeping flowers in good condition. Make sure the area has decent air circulation, especially if plants are outdoors.
Indoors, place gerberas near a window where they receive bright morning light or moderate light throughout the day. Avoid positioning them in areas where temperatures spike significantly, as extreme heat damages both foliage and flowers.
If you live in USDA zones 8–10, gerberas grow as warm-season annuals or tender perennials outdoors. In cooler climates, bring plants inside before winter arrives. Regardless of your climate, consistent bright light keeps your gerberas blooming regularly.
Gerbera Watering Schedule
Getting your gerbera’s watering routine right keeps the plant healthy and produces strong blooms. Water deeply once a week. The soil should stay moist but not waterlogged, since excess water causes crown rot.
Water gerberas deeply once weekly, keeping soil moist but not waterlogged to prevent crown rot and encourage vibrant blooms.
Your watering approach depends on where you grow your gerberas. For outdoor plants, water early in the morning so the foliage dries quickly and reduces leaf diseases. Skip overhead irrigation and target the soil directly instead. This minimizes disease risk.
If you’re growing gerberas indoors, water only at the base of the plant. Let the topsoil dry between waterings to prevent soggy roots, which cause decay and other problems.
After you divide or transplant gerberas, water them with about one inch of water right away. This helps the roots establish themselves in their new location.
Stick to a consistent watering schedule. Regular, measured watering produces plants with healthy blooms over time.
How to Plant Gerberas From Seeds or Division

Growing gerberas from seeds or division gives you two straightforward paths to expand your collection.
Starting From Seeds
Begin seeds indoors using damp potting soil. Cover the soil lightly with clear plastic to hold in moisture. Keep the temperature around 70°F. Once seedlings sprout and develop stronger growth, move them outside to a location that gets full sun. The transition takes patience, but the payoff is worth it.
Growing From Division
Water your existing gerbera daisies one or two days before dividing. This softens the roots and makes the process easier. When you lift the root ball, look for sections with healthy crowns and established roots. Plant each division so the crown sits right at ground level, spacing them 12 to 18 inches apart.
Caring for New Plants
Water newly planted divisions with one inch of water. Keep the soil moist for several months as the plants establish themselves. This consistent moisture is what allows the roots to spread and the plant to settle into its new location.
Gerbera Fertilizer Guide for Continuous Blooms

Once your gerbera divisions are established, regular feeding keeps blooms coming throughout the growing season. During spring and summer, apply a balanced water-soluble fertilizer with an N-P-K ratio of 10-10-10 or 20-20-20 every two weeks.
Always fertilize after watering to prevent root burn. Keep the fertilizer off the leaves and crown of the plant. If you accidentally get fertilizer on these parts, rinse the plant right away.
For continuous blooms, alternate between your standard fertilizer and a micronutrient-rich formulation. Look for products that contain iron, manganese, zinc, and boron to support heavy flowering. Water deeply after each feeding so nutrients reach down to the root zone.
When fall and winter arrive, reduce or stop fertilizing completely. Growth naturally slows during these months, and your gerberas need less feeding.
Deadheading Gerberas for More Flowers

Why do your gerberas stop blooming after a few weeks? The answer is deadheading. When you remove spent flowers, your plant stops trying to make seeds and instead puts energy into producing new blooms.
To deadhead properly, pinch or cut each faded flower stem at its base, right above the foliage. Use clean scissors or pinch with your fingers—both methods work. This technique works best from late spring through autumn when your gerberas are actively forming new buds.
Consistent deadheading, combined with adequate light and proper watering, keeps your plant vigorous and flowering longer. After removing blooms, keep the crown and surrounding leaves dry to prevent disease issues.
You’ll notice the results quickly—more flowers, tidier plants, and sustained blooms throughout the season.
Identifying and Treating Gerbera Pests and Diseases

Because gerberas are prized for their vibrant blooms, pests and diseases can quickly undermine all your care efforts. You need to stay vigilant about common pests and fungal issues that threaten your plants.
Gerberas’ vibrant blooms attract pests and diseases that can quickly undermine your care efforts—stay vigilant.
Watch for these specific problems:
- Aphids, spider mites, and whiteflies clustering on stems and leaves
- Yellow or brown spots appearing on foliage, usually in humid conditions
- Powdery white coating developing on leaves and flowers
- Wilting plants despite moist soil, which signals root rot
Inspect your gerberas regularly—at least once a week. When you spot pests, spray them with insecticidal soap or horticultural oil, following the product label directions for application rates and frequency.
Prevent fungal problems by changing how you water. Apply water directly at the base of the plant and avoid getting water on the leaves or flowers. Good air circulation matters too, so space your plants far enough apart that air can move between them. Remove any damaged or yellowing leaves as soon as you see them.
If your plants show stunted growth along with yellowing leaves, apply a balanced fertilizer with micronutrients. Use a formula with equal nitrogen, phosphorus, and potassium (like 10-10-10) and follow the package instructions for your pot size. These straightforward steps keep your gerberas healthy.
Growing Gerberas Indoors With Bright Light

Now that you’ve protected your gerberas from pests and diseases, set them up indoors where light is your main concern. These plants need bright light to flower well. Position them near a south or west-facing window where they get morning sun and afternoon shade. If that’s not possible, provide strong light from another direction throughout the day. This setup supports blooms without burning the leaves.
If your indoor light is weak, add grow lights positioned 2 to 3 inches above the plants. Rotate your gerberas once a week so all sides receive even light exposure. Low light won’t kill the plant right away, but you’ll see fewer flowers and slower growth. Getting the light right puts you halfway toward success with indoor gerberas.
Overwintering Gerberas: Indoor and Cold-Climate Care
When frost threatens your area, you’ll need to decide whether to treat your gerberas as annuals or bring them indoors for the winter. Overwintering indoors protects your plants from harsh conditions and lets you enjoy them year-round.
Protect gerberas from frost by bringing them indoors for winter, allowing year-round enjoyment and growth in harsh climates.
Steps for successful indoor care:
- Move plants to bright locations with morning sun and afternoon shade to prevent leaf damage.
- Keep soil barely moist, watering only when the topsoil feels dry to the touch.
- Pots must drain completely after watering to prevent root rot and fungal issues.
- Maintain cool temperatures to slow growth and extend dormancy naturally.
Come spring, gradually introduce your gerberas to brighter conditions. Resume regular feeding and repot as new growth appears. This approach keeps your plants healthy and ready for vibrant blooms when warmer weather returns.
When and How to Divide Gerberas

Water your gerbera deeply one or two days before you divide it. This hydration reduces the shock to the plant when you move it. Dig up the entire plant about 8 inches deep and carefully remove the soil from around the roots.
Use pruning shears to cut through the root system. Make sure each division has its own crown and healthy roots attached. The crown is the part where the stems meet the roots.
Prepare your new planting site by mixing 2 inches of peat or compost into the topsoil. Replant each division with the crown sitting right at ground level. Space them 12–18 inches apart so they have room to grow without competing for water and nutrients.
Preparation Before Division
How’d you like to multiply your gerberas without buying new plants. Before you divide your Gerbera Daisy, you need to prepare properly.
Water your plant with one inch of water one or two days before division. This gives the root ball time to become hydrated and easier to separate. The soil will absorb moisture throughout the plant, and the roots will feel firm and ready for handling. A hydrated root ball won’t crumble apart as you work, which protects the roots during the division process. Each new plant you create will have the strength it needs to establish itself in its new location.
Planting Divided Sections
Your gerbera’s root ball is hydrated and ready. Lift the entire plant from the ground and begin separating it into divisions. Gently remove soil from the roots with your hands or a soft brush. Once you can see the root structure clearly, use a clean knife to cut through the roots and create multiple sections.
Each new division needs its own crown and healthy roots attached. The crown is the point where leaves emerge from the soil. Divisions without a crown won’t grow properly, so check this carefully before planting.
Prepare your planting area by mixing two inches of peat moss or compost into your topsoil. This creates a loose, nutrient-rich bed for your divisions. Space each division 12 to 18 inches apart so they have room to spread as they mature.
Plant each division at the same depth it was growing before. The crown should sit right at ground level—not buried and not exposed. Push soil gently around the roots to remove air pockets, but don’t pack it down hard.
Water immediately after planting, applying one inch of water. Keep the soil consistently moist for the next several months while roots establish themselves. This steady moisture helps prevent stress and allows roots to spread through the soil.


